In the previous post, we explained you four components of a theme: Theme Colors, Theme Fonts, Preset Background Styles, and Slide Master. ActivePresenter 7 gives you a lot of options to apply and customize them the way you want. Today, we’ll give you details about the techniques for working with Theme Colors. For others, just click the links below to know more:
Now let’s dive deep into how to work with Theme Colors.
Overview of Theme Colors
ActivePresenter 7 comes with several sets of built-in Theme Colors. You have freedom to apply them to your project. In case you aren’t satisfied with them, just create your own set.
Theme Colors are placed in the theme color gallery. To access it, go to the Design tab > Colors.

Normally, the theme color gallery has three sections. The Custom one includes Theme Colors you’ve created. The Built-in has preset Theme Colors. The Other section offers you two options to create and reset Theme Colors. We will discuss them later in this tutorial.
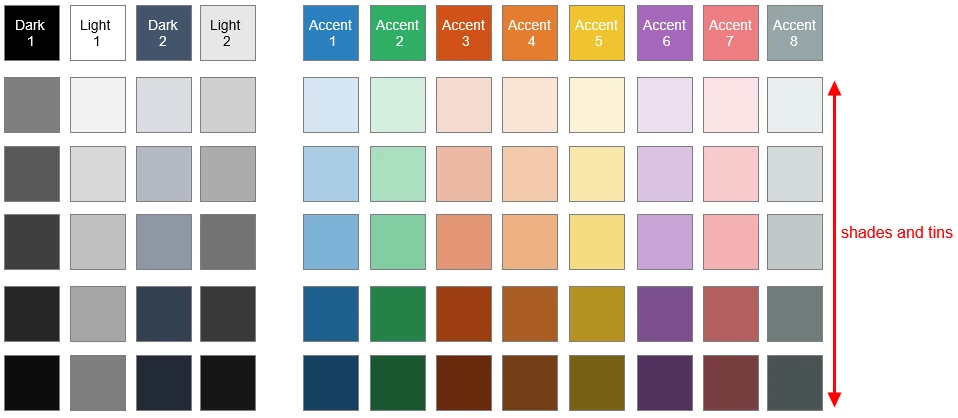
The currently applied Theme Colors are highlighted with a gray outline. Basically, Theme Colors are a set of colors. In the Theme Colors, the first four colors (from left to right) represent text and background colors (light and dark for each). The remaining colors illustrate six accent colors for objects such as shapes and images.
Note: You can hover over any Theme Colors in the gallery to see how they will affect the look of your slide.
Apply and Manage Theme Colors
To apply a set of Theme Colors, select your slide(s) first. Then, click Design > Colors > click the colors you want. This way, ActivePresenter applies the new Theme Colors to all slides that share the same Slide Master as the selected slide(s).
To have more options, right-click a set of colors and do any of the following:
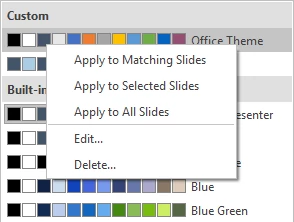
- Apply to Matching Slides: This option works the same way as when you click a set of Theme Colors.
- Apply to Selected Slides: This applied the Theme Colors to currently selected slides only.
- Apply to All Slides: This applied the Theme Colors to all slides in your working project.
- Edit…: This brings you to the theme color editor where you can edit the currently selected Theme Colors.
- Delete…: If you no longer need any theme colors, select this option to remove it. After that, the Theme Colors don’t appear in the theme color gallery anymore.
If the new Theme Colors don’t please you, click Reset Slide Theme Colors to restore the original Theme Colors. Then, all colors change to their original colors. This option is at the bottom of the theme color gallery.
Note: The Edit… and Delete… options are available for custom Theme Colors only.
Create New Theme Colors
Steps to Create New Theme Colors
ActivePresenter allows you to create a new set of Theme Colors from an existing one. To perfomr this task, do the following steps:
Step 1: Click Design > Colors > select any available Theme Colors (built-in or custom).
Step 2: Click Create New Theme Colors… to open the Create New Theme Colors dialog.

As can be seen, the Create New Theme Colors dialog has two main sections: Theme Colors and Sample. The first shows 12 current Theme Colors. The second is where to preview the changes you make. This dialog allows you to specify your color preferences. Do that by clicking each Color Picker.
These color choices also determine preset colors available when you select fill and outline colors for objects. So, be careful!
Tip: When specifying colors, especially accent ones, it’s better to look at the Sample box. This box gives you a preview of changes. So, you know how a color looks next to another in a column or bar chart.
Step 3: Enter your desired name for new Theme Colors in the Name box.
Step 4: Click Save. Then, the custom Theme Colors will appear in the Custom section of the theme color gallery. You can apply it to your current project or any future project.
In case you wish to restore the original Theme Colors, click Reset.
Note: ActivePresenter saves custom Theme Colors in C:\Users\\AppData\Roaming\ActivePresenter\themes\colors (for Windows) or /Users//Library/Application Support/ActivePresenter/themes/colors (for macOS). From here, you can:
- Rename theme color files.
- Delete any theme color file. Then, they no longer appear in the theme color gallery.
- Share and reuse theme color files.
Things to Remember When Creating Theme Colors
To create an ideal set of Theme Colors, below are some important things you should know.
As mentioned earlier, the theme colors consist 12 colors, including four text/background colors and eight accent colors. Once you already created custom Theme Colors, the Color Picker will have new tints and shades automatically created by ActivePresenter. It’s impossible to control how tints and shades are defined. But you can adjust them by clicking More Colors. Note that shades and tints can be slightly different, depending on the used Theme Colors.

The order of 12 colors is very important. That is, the order of text and background colors defines which color will be used as the default text color and default background. Dark 1 and Dark 2 should always be dark colors. At the same time, Light 1 and Light 2 should always be light colors. With these in mind, a good choice is to keep black and white among the first four text and background colors.
Tip:
- Select 12 colors for new Theme Colors carefully. Also, you should choose eight distinctive colors for your accent ones, and they are different from four colors for text/background.
- You’re free to choose any color for text and background besides black and white. But make sure you choose text colors that contrast well against background colors. This ensures that the text is visible on the new background.
- When specifying colors, especially accent ones, it’s better to look at the Sample box. This box gives you a preview of changes. So, you know how a color looks next to another in a column or bar chart.
Edit Theme Colors
To edit any custom Theme Colors, do the following:
Step 1: Click Design tab > Colors.
Step 2: Right-click your desired Theme Colors > Edit. This displays the Create New Theme Colors dialog. Then, do the same steps as when you create a new set of Theme Colors.
That’s all! From now on, don’t forget to use Theme Colors in designing eLearning contents with ActivePresenter 7. Using them is a good way to change the look of your presentations or courses quickly.