YouTube videos are one among plenty of annotation objects that ActivePresenter 9 supports you. By embedding them into slides, you can easily stream and play YouTube videos within the presentation. Keep reading for more information!
In the previous tutorials, you’ve learned how to insert many ActivePresenter objects into a project such as shapes, images, text captions, spotlight, you name it. This article will provide you with simple steps to insert and work with embedded YouTube videos.
Before going ahead, click the button below to download and install the latest version of ActivePresenter on your computer.

The article covers:
Insert a YouTube Video
Video is an amazing resource to turn your eLearning course into engagement and illustration. To insert a YouTube video into your ActivePresenter project, take the following steps:
Step 1: Access the Insert tab > YouTube. Then, the Insert YouTube Video dialog pops up on your screen.
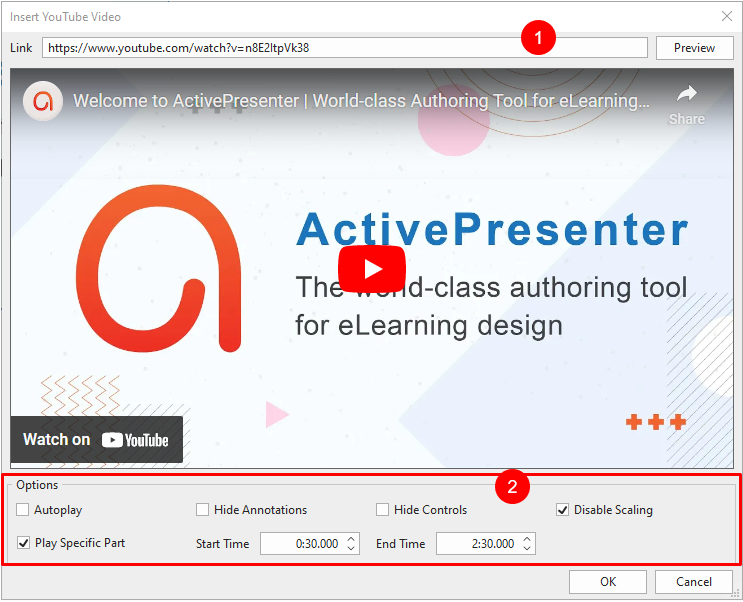
Step 2: Enter a YouTube video’s URL into the Link text box (1).
Step 3: Click Preview to load and preview the video within the dialog. Alternatively, press ENTER on the keyboard.
Step 4: Specify playback options (2) for the video.
- Autoplay: Make the video start playing as soon as the slide’s timeline reaches the start time of the video object. In other words, this option determines whether the video will start automatically or require manual activation.
- Hide Annotations: Hide annotations in the video such as notes, labels, or titles.
- Hide Controls: Hide the player controls for the video. Have in mind that without controls, viewers can still play or pause the video by clicking it.
- Disable Scaling: Keep embedded content the same when scaling a slide. For example, when zooming and panning in the AutoFit mode of the presentation. This option is turned on by default.
- Play Specific Part: Play just a specific part of the embedded video, rather than the whole one. Select this option then enter the start and end time (in seconds) in the spin boxes. For example, if you want the video to play for 2 minutes starting from the 30th second, enter “0:30.000” in the first box and “2:30.000” in the second box.
Step 5: Click OK to finish.
Work with an Embedded Video
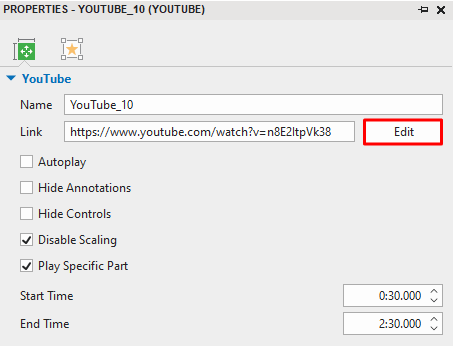
After embedding a YouTube video on a slide, ActivePresenter 9 brings you some options to customize it.
First of all, you can replace the YouTube video link by accessing the Properties pane > Size & Properties > YouTube > Edit.
As said earlier, YouTube video is an ActivePresenter object as well. Therefore, right-click the video object on the Canvas to see more options:
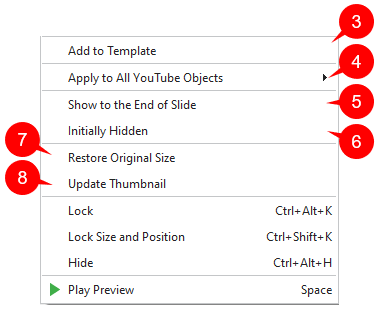
To save and reuse a YouTube video across projects, select Add to Template (3) to store it in the Object Templates. See the tutorial Create and Use Object Templates for more details.
ActivePresenter 9 also allows you to apply video animations or the show in mode options from one video to other ones. Quickly get it done by selecting the Apply to All YouTube Objects option (4) > Animation/Show In Mode.
To match the video to the slide duration, select Show to the End of Slide (5). In other words, this option makes the YouTube video play until the end of the slide.
You can hide the YouTube video object until it is called by an event with the option Initially Hidden (6).
After embedding the YouTube video on a slide, you can resize it to the desired size. However, in case the change doesn’t please you, right-click it > Restore Original Size (7).
Besides, it is possible to update the thumbnail for the YouTube video object by choosing Update Thumbnail (8).
What’s more, you can also Lock, Lock Size and Position or Hide the video on the slide.
Note:
- YouTube video only works in HTML5 output. So, in other outputs, it is exported as an image.
- Due to technical limitations, there is no warranty that the playback of a YouTube video will always synchronize with the playback of the project.
- On mobile devices, only user-initiated playback is acceptable. So, users need to click a YouTube video to play it even when they enable Autoplay. For this reason, you should not select the Hide Controls option when creating content for mobile devices.
So, that’s all the techniques to insert YouTube videos into ActivePresenter 9 projects. Feel free to experience the feature and contact us if you need any assistance.
Related tutorials: