Images play a critical role as a valuable tool for visualizing concepts and texts that cannot be adequately conveyed through words. In this article, let’s learn about adding image objects in the new release version of ActivePresenter – ActivePresenter 9.
As you may know, images can create more positive responses and keep students engaged in the lesson instead of text-based content. In ActivePresenter 9, you are free to add as many images as you want. This can be done in some simple steps. The app supports adding multiple image formats, including PNG, JPG, JPEG, BMP, GIF, and SVG.
In this tutorial, you will walk through 2 main parts:
First of all, download the app to try out this feature.

Add an Image Object
Basically, ActivePresenter 9 offers three ways to add an image object to the project. Now, perform any of the following:
- Open the Insert tab > click Image
 > choose one or more images from your computer.
 - Select one or more images from your folder > drag and drop them into the Canvas.
- Open the Insert tab > Screenshot . See Take Screenshots for more details.
Note: When importing images into Canvas, if the image size is larger than the slide size, the image will be automatically resized to maintain its aspect ratio and displayed sharply.
Customize Added Images
Replace Images
After inserting an image object into the project, it is possible to swap it with another. This is useful when you want to change the image but keep all existing animation effects. Check out the steps below:
Step 1: Select the image.
Step 2: Navigate to the Properties pane > Size & Properties > Image. Then, you can replace it with an image from your current project (1) or your computer (2).
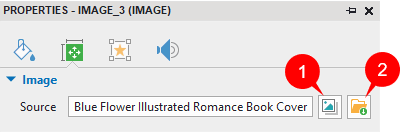
Then, the newly added image object replaces the old image at once.
Note: In case the new image size isn’t similar to the old image size, it will be resized to fit the old one. So, it’s better to replace the existing image with a new image of the same size.
Edit Images
Generally, ActivePresenter 9 gives you a lot of options to edit an added image. Now, select the image, and then perform any of the following:
- Move the image to a different spot on the Canvas by dragging and dropping it. Alternatively, access its Properties pane > Size & Properties tab > Transform section > adjust the Left and Top combo boxes’ value.
- Resize the image by simply dragging its resizing handles. Or navigate to its Properties pane > Size & Properties tab > Transform section > adjust the Width and Height combo boxes’ value. If the new size doesn’t satisfy you, click Restore Original Size to revert the image to its original size.
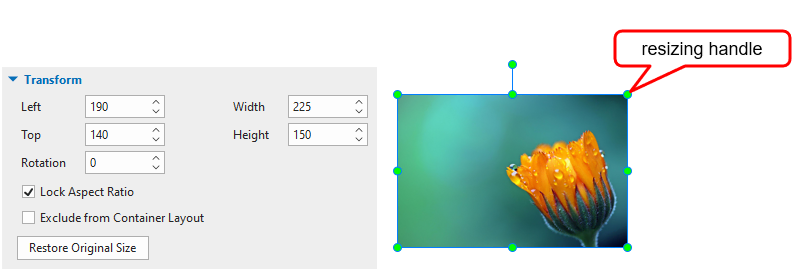
- Keep the ratio between the width and the height of the image unchanged when resizing it by ticking the Lock Aspect Ratio checkbox.
- Rotate the image by right-clicking it > Rotate > Rotate Right/Left 90*. See Rotate Objects for more information.
- Flip the image by right-clicking it > Rotate > Flip Vertical/Horizontal. See Flip Objects for more information.
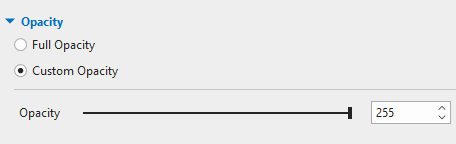
- Adjust the opacity level of the image by navigating to the Properties pane > Style & Effects tab > Opacity. By default, the Full Opacity option is enabled. Select the Custom Opacity option if you want to customize this property. Then, feel free to adjust the value by dragging the slider or specifying a value in the spin box. If the value is 0, the whole selected image becomes transparent. Increasing this value will make it more apparent.
- Crop the image by navigating to the Properties pane > Size & Properties > Crop. Take a look at Crop Images and Videos for a better understanding.
- Add animation effects to the image by using the Animations tab. See Animating Objects for more details.
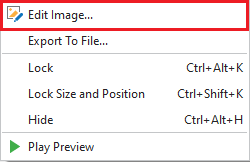
- Edit the image more professionally with the image editor. To access this editor, right-click the image > Edit Image… This opens the Image editor and the Drawing tab.
Tip:
When you’re done with editing, if you wish to use the image as a background image, right-click it > Merge into Background. Then, the image will be merged into the background. However, the image’s time bar along with all related animations (if any) will disappear.
It’s easy to add image objects in ActivePresenter 9, isn’t it? Remember to use images to bring visualization into your eLearning courses. Feel free to contact us if you need any support.
Related articles: