Are you looking for a quiz maker that helps create high-quality and professional-looking interactive quizzes? If yes, ActivePresenter 10 will satisfy you.
ActivePresenter is a powerful eLearning authoring tool. The release of version 10 brings you more advanced features to assist you in creating engaging online quizzes. By implementing two new question types, ActivePresenter 10, a course creation tool increases the total of questions to 13 types. The variety of ready-made question templates can help you design quizzes more quickly and easily.
In this article, let’s walk through four basic steps to create interactive quizzes in ActivePresenter 10:
- Insert Question Slides: Create different types of interactive questions.
- Change the Question Container Layout: Arrange question elements in the container.
- Set Score and Reporting: Set points, attempt, and time limit for each question.
- Add Events – Actions: Make questions interactive and engaging.
- Export Quiz to HTML5/ SCORM or xAPI Package: Set quiz duration, and pass/ fail conditions, then export the project to the output that you want.
Insert Question Slides
With up to 13 ready-to-use question templates, you can easily create interactive quizzes in ActivePresenter 10 within a few clicks.
Do one of the following ways to insert a question:
- Open the Questions tab > select one question type.

- Click the Interactions button in the Home tab > select one question types.
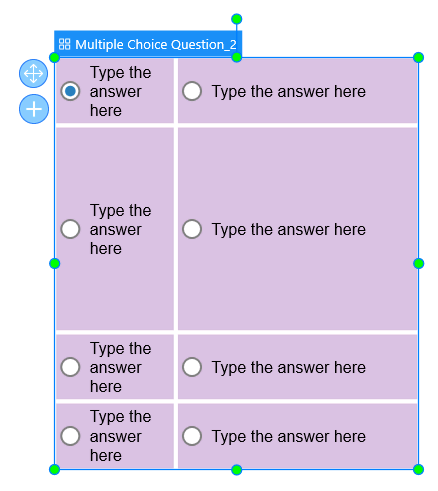
Then, a new question slide will appear on the Canvas as the image below:
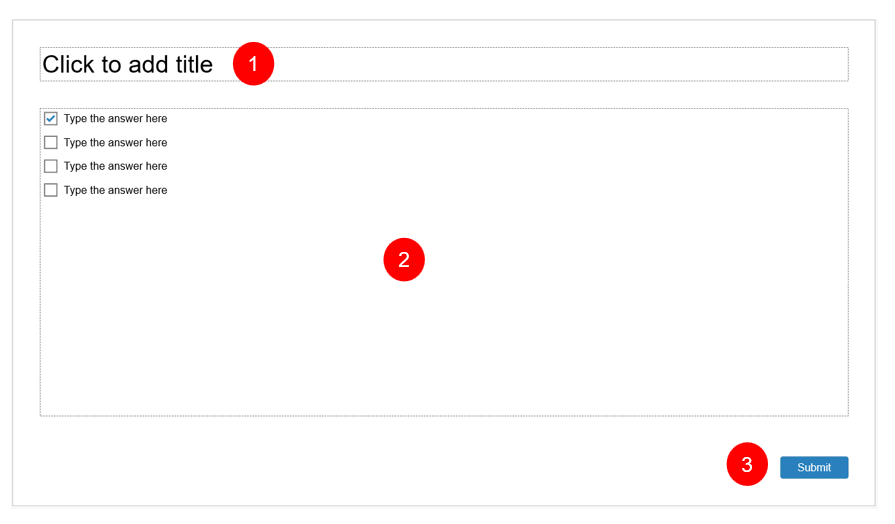
No matter which question type you selected, each question slide has three components:
Question Title (1)
That’s a placeholder where you can enter the title of the question.
Answer Area (2)
The answer area is the main part of a question. The answer area of each question is unique due to the question’s nature. It may include a list of options (Multiple Choice), dropdowns (Select in Dropdowns), or blanks (Fill in Blanks). Here, learners are required to select an option or fill in blanks to answer the question.
In this section, you can customize the answer options such as add, delete them, or change the container layout. For most question types (except for True/False, Fill in Text Entry, Select in Dropdown, and Essay), you are free to add more answer options or delete them as desired. Select the answer area, then click the Plus button to add more answer options.
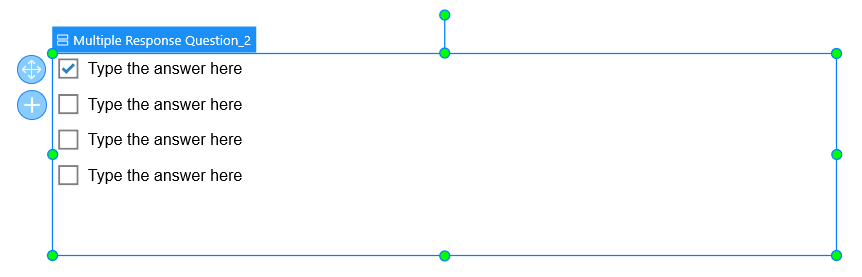
By contrast, if you want to delete unwanted answer options, select them and press DELETE on your keyboard. Besides, you can change the container layout in the Container Layout section of the Size & Properties tab (Properties pane).
Submit Button (3)
Each question slide comes along with a Submit button. This button allows learners to submit their answers. You are free to customize its properties.
Change the Question Container Layout
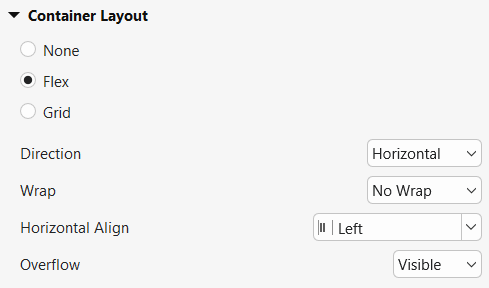
There are 3 types of question container layouts including None, Flex, and Grid. To access these layouts’ settings, you select the answer area of questions, then navigate to the Properties pane > Sizes & Properties tab > Container Layout.

Note that you cannot define the container layout for the following questions: Fill in Text Entry, Fill in Blanks, Hotspot, Essay, and Select in Dropdown. The reason for that is the answer area of these questions cannot be arranged in rows and columns. Therefore, you can freely change the size and position of the answer area as you wish.
None Layout
Select the None layout if you want to change the size and position of the answer options manually. This layout of questions allows you to drag each answer option to the desired position. Besides, you can also freely resize each of them the way you want.
Grid Layout
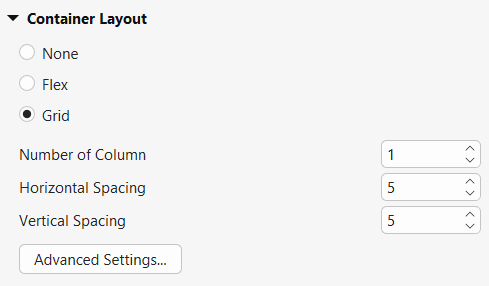
Selecting the Grid layout, answer options will be automatically arranged in the grid pattern. In detail, this layout of questions will be assigned to a fixed size and position for answer options. That means you cannot change the size and position of each answer option separately as you do in the None layout.
Instead, the size and position of answer options in the Grid layout will be defined by the Number of Column, Horizontal Spacing, and Vertical Spacing:
- Number of Column: Enter a number in the combo box to set the number of columns in the answer area.
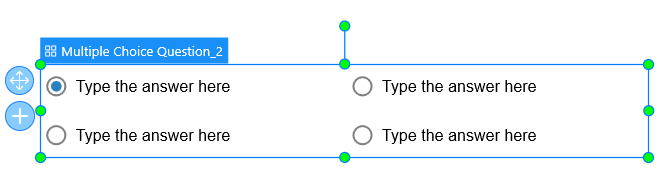
For example, if the value is 2, answer options will be automatically arranged in two columns:
- Horizontal Spacing: Enter a number in the combo box to set the value of the horizontal space between columns.
- Vertical Spacing: Enter a number in the combo box to set the value of the vertical space between rows.
After changing these properties of the Grid layout, ActivePresenter 10 will adjust answer options depending on the values that you define. You can resize and reposition the whole group, and this will not affect those values.
For further modifications, click the Advanced Settings button. The Container Layout Advanced Settings dialog appears:
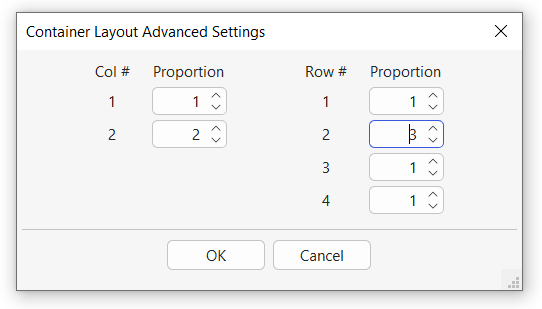
This dialog allows you to define the width ratio between columns and/or the height ratio between rows.
For example, in the image above, the 1:2 ratio in the Col # section means that the width of the first column is one-half of the second column. Meanwhile, the 1:3:1:1 ratio in Row # is the proportion of the 4 rows’ height, respectively.
Flex Layout
The Flex layout is available for a flex box, a slide, or a group of objects. The answer area of a question is also considered a group of objects as it contains multiple text box objects. In responsive projects, if you insert a question into a flex box, you may want to use the Flex layout to avoid overlapping with other elements. For more information about this layout, see how to work with Flex Box.
Set Score and Reporting for Interactive Quizzes
ActivePresenter 10 allows you to set scores, attempt, and time limit for each question. To have it done, select the answer area and access the Score & Reporting section of the Interactivity tab. Then, customize its properties as desired.
Select the Graded Mode or the Survey Mode
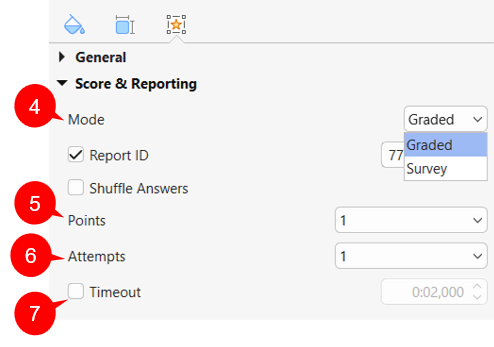
Each question type has two modes (4) to select: Graded and Survey, except for the Rating Scale (Likert) question which has only the Survey mode.
Select the Graded mode if you want to evaluate the learners’ performance. Meanwhile, the Survey mode allows you to collect their feedback, opinions, or information. For this reason, the Graded mode has some typical properties that are not included in the Survey mode. They are Points, Attempts, Shuffle Answers, and Case Sensitive.
Set Points, Attempts, and Time Limit for Interactive Quizzes
As mentioned above, the Points and Attempts options are only available in the Graded mode. Thus, to customize them, you have to turn this mode on at first.
Points (5)
Select a number from the Points dropdown list to set scores for questions. Or, type a number in the Points combo box. If learners answer correctly, they will get the number of points you’ve set.
Attempts (6)
The Attempts value indicates how many times learners can interact with questions. By default, this value is equal to 1. But, you can change it by typing a number into the combo box or selecting a number from its dropdown list. If you select Infinite from the list, the number of attempts will be unlimited. Learners can interact with questions as many times as they want.
Timeout (7)
ActivePresenter 10 allows you to set the time limit for questions no matter whether the Graded or Survey mode is on. To have it done, select the Timeout checkbox. Then, enter the amount of time that learners will have to fulfill the quizzes. Or, click the up/down arrow to adjust the time value. When time runs out, questions are disabled. At that time, learners cannot interact with them anymore.
Other Properties of the Score & Reporting Section
Apart from the three properties above, there are some other options that are customizable in the Score & Reporting section. They allow you to adjust how the interactive quizzes are presented to learners and how the report displays to you. Note that these properties are different depending on the question type and mode (Graded or Survey).
Report ID
ActivePresenter 10 assigns a unique identification number to each question in the report. You can change from this default number to a meaningful text for easy identification:
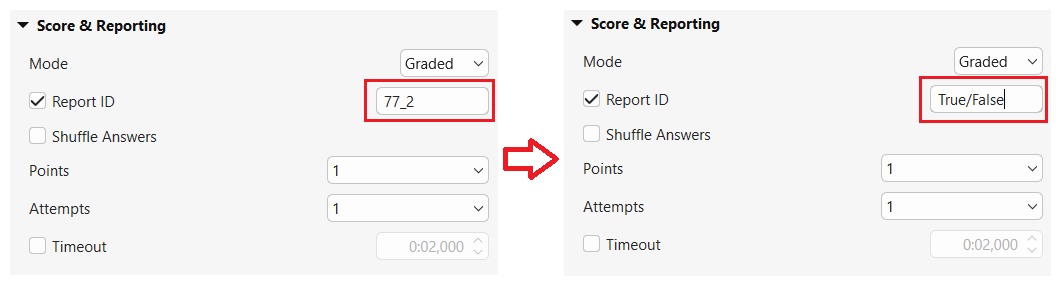
Note that only text that contains alphabetical and numerical characters (A-Z, a-z, 0-9) and the symbol underscore (_) is allowed. The maximum length is 250 characters.
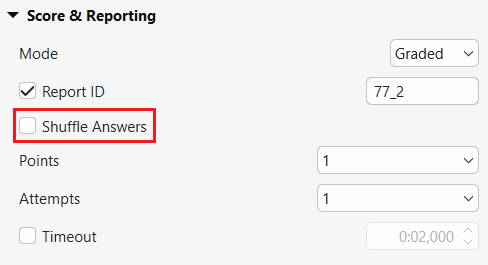
Shuffle Answers
This option allows you to change the answer options’ order each time the presentation loads the question slide. Select this checkbox to enable this feature. This property is only available in some question types, namely True/False, Multiple Choice, Multiple Response, and Drag-n-Drop.
Rating Scale
This property only appears in Rating Scale (Likert) questions.
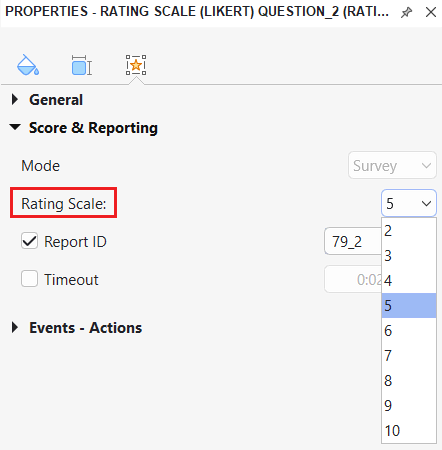
The number in the Rating Scale list indicates the number of rating scale columns in the answer area. For example, if you select 5, in the question slide, there will be 5 rating scales displayed in the answer area.
Password Field
Only Fill in Text Entry and Fill in Text Entries questions contain this property.
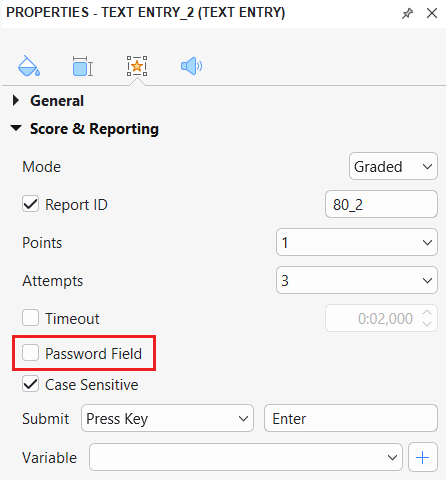
When you select this checkbox, all characters that you type in the textbox will not be shown.
Case Sensitive
This property is available in Fill in Text Entry, Fill in Text Entries, Fill in Blanks, and Essay questions.
When this checkbox is selected, the uppercase and lowercase characters will be treated differently. For example, the correct answer to a question is “Vietnam”. However, if learners type “vietnam” or “VIETNAM”, their answers will be considered as incorrect ones.
Submit
You can see this property in Fill in Text Entry and Select in Dropdown questions. It offers to Fill in Text Entry questions two options to submit the answers: Auto and Press Key. Meanwhile, Select in Dropdown questions have Auto and Manual options.
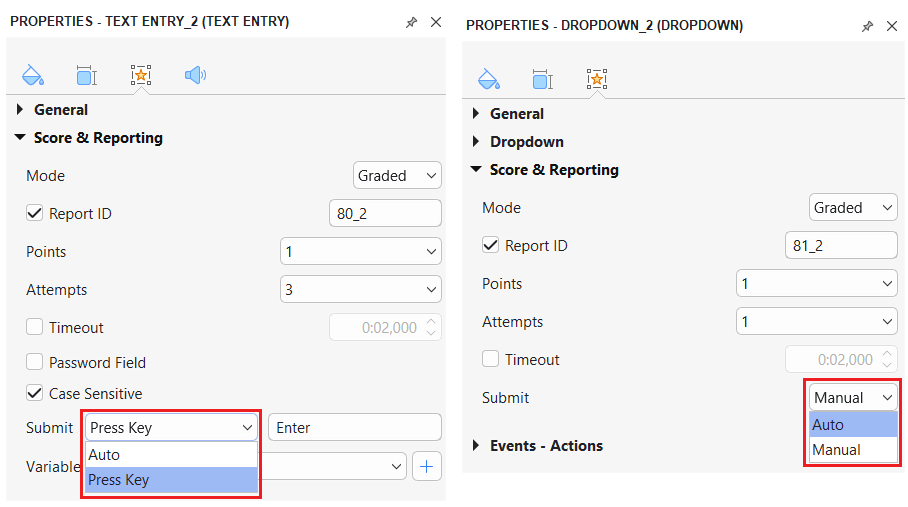
- Auto: For Fill in Text Entry questions, ActivePresenter 10 validates the entered text whenever learners press any key. As long as the entered text partially matches the correct value, the presentation will wait for learners to input more text. The moment the last entered character is found to be different, it will be considered as an incorrect answer. For Select in Dropdown questions, the answer will be submitted automatically right after learners select an option from the dropdown list.
- Press Key: It allows you to submit the entered text by pressing a specific key or key combination. For example, you input Alt+Z in the side box. When learners press Alt+Z their answers will be submitted.
- Manual: Learners have to click the Submit button to submit their answers.
Variable
You will see this property in Fill in Text Entry, Fill in Text Entries, Essay and Select in Dropdown(s) questions. Use it to define the variable to take place.
Add Events – Actions to Questions
To make any object interactive, you have to add events – actions to it. So does the question. It is the most important part when creating interactive quizzes. Normally, each question has events – actions added by default. But, you can customize it as you wish.
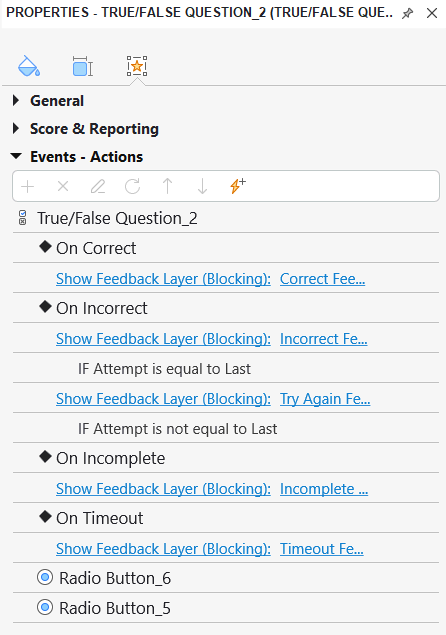
To customize events – actions of a question, select the answer area > navigate to the Properties pane > Interactivity tab > Events – Actions section > add more, delete or change them as you want.
Export Interactive Quizzes to HTML5, SCORM or xAPI Packages
Finally, when you’ve finished setting everything up, you can export your interactive quizzes to HTML5, SCORM package, or xAPI package, depending on your needs. To do that, open the Export tab and select the output format that you want to export:

Then, a dialog will appear offering many setting options. The General tab of this dialog allows you to set quiz duration (8) and pass/ fail conditions (9) for your online quizzes.
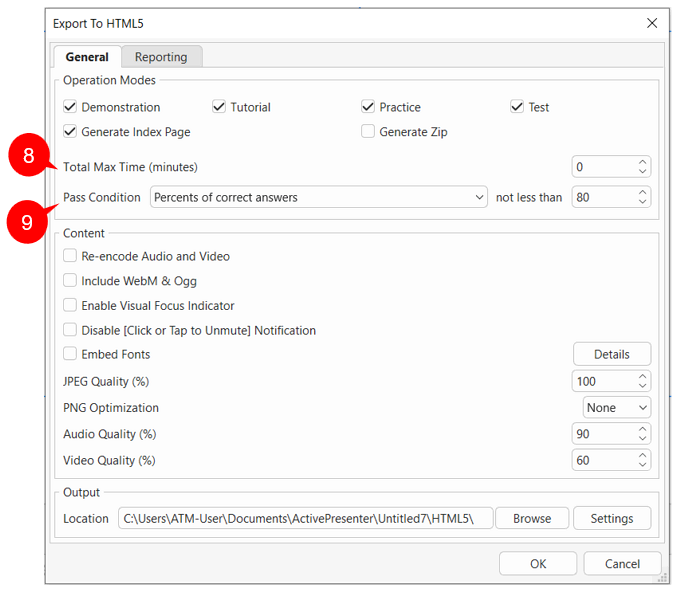
- Total Max Time (minutes) (8): Enter a value into the combo box to set a time limit for the whole quiz. To disable this feature, set the value to 0.
- Pass Condition (9): Choose one of the following options: Percents of correct answers, Points gained, Number of correct answers, and Number of slide views to define the pass/ fail conditions for your online quizzes.
That are four basic steps to create interactive quizzes in ActivePresenter 10.
Download ActivePresenter right now and start creating your own quizzes.
