Wheel spin games are useful in some ways. For example, you can integrate this game type into eLearning courses to challenge learners about a specific topic. This way, learners feel more engaged and motivated to join the course.
Today I’ll show you how to create a wheel spin game with ActivePresenter – an all-in-one authoring tool that helps you create stunning interactive games and eLearning content.
To be able to create this game following the instructions in this post, you will need to download ActivePresenter first. The app is compatible with both Windows and macOS, so click the button below and choose the right version for your device!

How does a Wheel Spin Game Look Like?
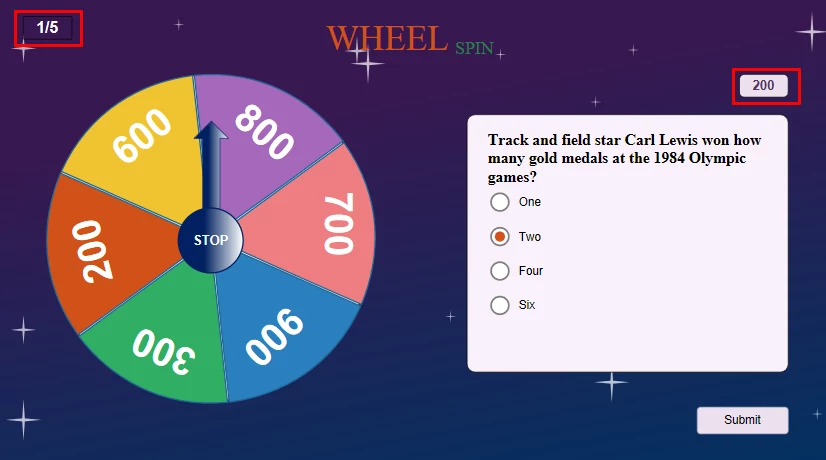
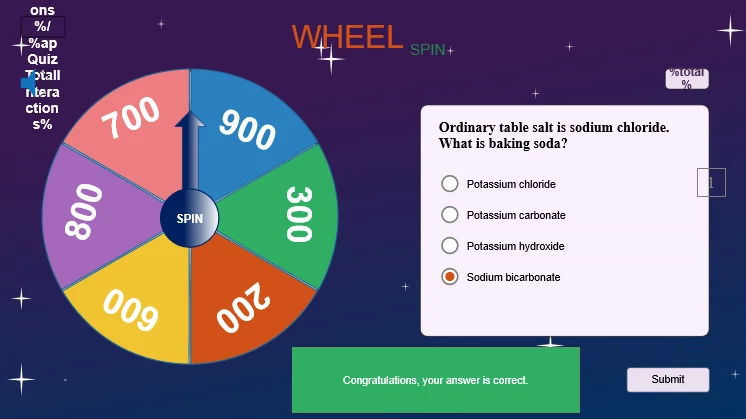
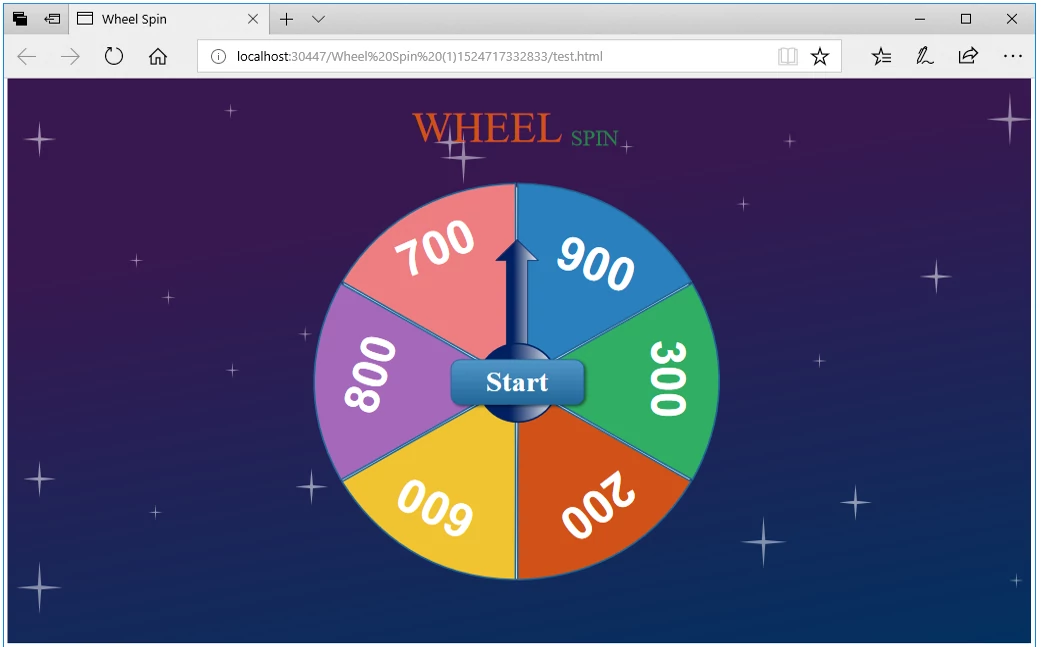
Below is a wheel spin game created with ActivePresenter 7. It’s better to play the game so you’ll know how it looks like.
Let’s take a look at an overview of this wheel spin game.
How to Play
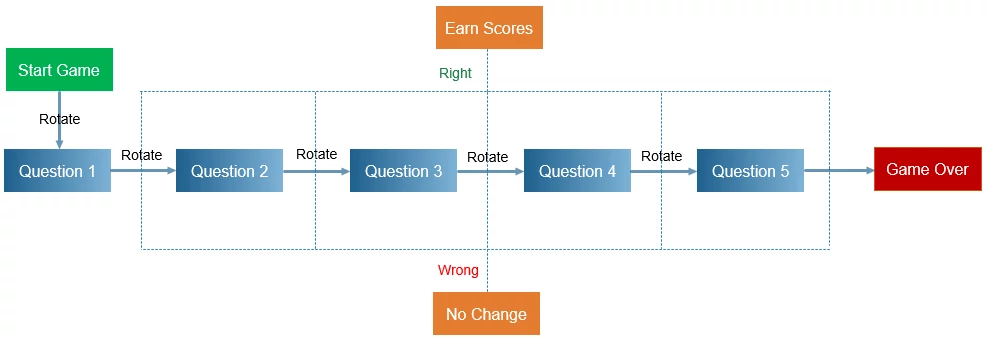
A learner has to spin the wheel to determine a score value and get a question. If he gives a correct answer, he achieves that score. The more correct answers he gives, the more scores he can get. In case the answer is incorrect, he doesn’t have any score but still proceeds to do the next spin.
Once the learner answers all 5 questions, the game finishes. The final score is the sum of scores of correct answers.
Game Design Idea
The spin wheel game has one Start Game slide, five question slides, and one Game Over slide. There is a wheel in the Start Game slide and all question slides, which has six pies with different colors and different scores. Also, it includes a Spin button and an arrowhead in the center. You can create this wheel using shape objects such as oval, lines, and freeform shapes. Besides, the background of this game has a lot of stars which twinkle endlessly. These star objects are available in ActivePresenter.
Regarding interactions, you’ll use variables, conditional actions, and JavaScript to make the wheel spin game work. At the same time, use events – actions to interact with learners when they give answers. These tasks will be done in the Slide Master.
Mind that the game uses some external resources to make it more engaging. These resources are four audio tracks, and you can easily find them on the Internet. One track appears when the Start Game slide plays. One is meant for the sound of the wheel spinning. Others play when learners give a correct answer or an incorrect answer.
Basically, there are six steps in total:
- Design the Game Theme
- Design an Interactive Wheel
- Create Start Game and Game Over Slides
- Create a Question Pool
- Export the Game Project to HTML5
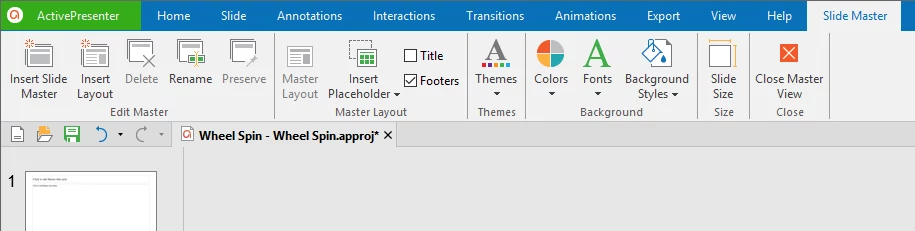
The first two steps can be done in the Master View (in the View tab > Slide Master). This view gives you Slide Masters and the Slide Master tab with many useful commands.
Each Slide Master includes a master layout and a collection of slide layouts. These layouts inherit properties from the master layout. You’ll create a Slide Master which contains theme properties, question placeholders, events – actions, etc. Then, use slide layouts to make a wheel spin game. Everything seems to be a walk in the park.
For the remaining steps, perform them in the Normal View.
Step 1: Design the Game Theme
When accessing the Master View, you see a default Slide Master which is used in the current project. Since you want to use the same theme for all slides, you need to work with one Slide Master.
1. Edit the Theme
ActivePresenter provides a theme gallery with different themes (in the Design tab > themes). Each theme has the following elements: Theme Colors, Theme Fonts, and Preset Background Styles. You’re free to customize the theme you want like editing the background style, changing colors and fonts for objects, etc.
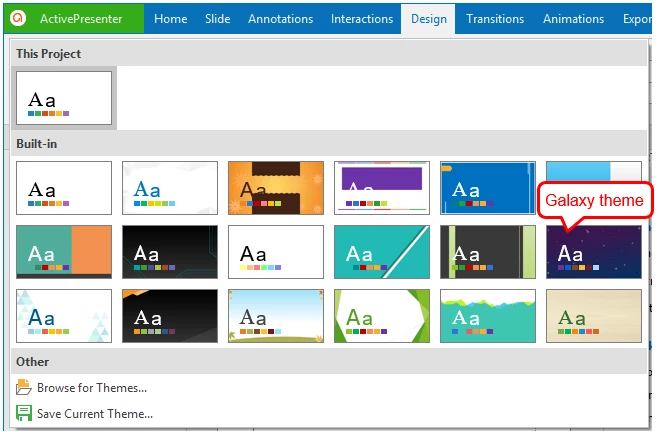
Let’s say you want to use the Galaxy theme. Just click it, and this theme applies to the current project immediately.

At this point, you may wonder how to make these stars twinkle throughout the project. The answer will come in the next part of this tutorial.
2. Create Animation Loop for Star Objects
To have stars twinkle endlessly, you need interactive timelines and actions.
Here is the idea: first, create a new interactive timeline. Next, add the Pulse emphasis effect to a star object and make this effect repeat until the slide ends. Then, apply the effect to all star objects. Finally, trigger an action to call the interactive timeline when the slide starts. This way, stars twinkle until the Game Over slide ends.
Do the following:
Step 1: Select the master layout (the first slide in the hierarchy).
Step 2: In the Timeline pane > Timeline list box > Add Timeline. Name it as TimelinePulse.

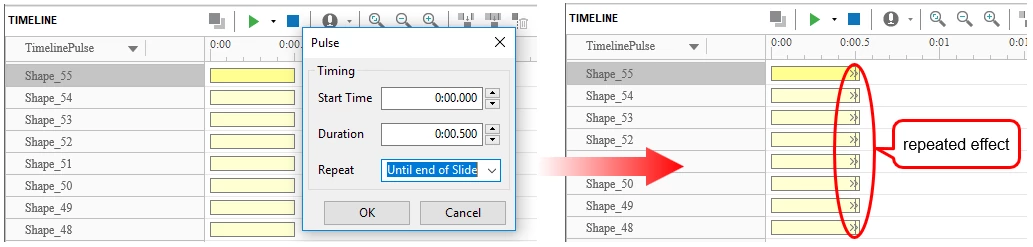
Step 3: In the TimelinePulse timeline, add the Pulse emphasis effect to a star object. Then, double-click the effect Time Bar > Repeat > Until end of Slide. This makes the effect play until the end of the slide.
Step 4: Right-click the selected star object on the Canvas > Apply to All Shape Objects > Animation. This applies the animation effect to all star objects on the Canvas.
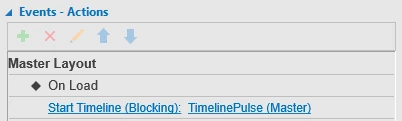
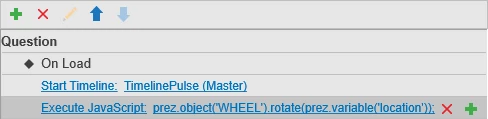
Step 5: Add the On Load event and the Start Timeline action to the master layout. Go to the Properties pane > Interactivity > Events – Actions to do this.
3. Customize the Question Layout
Using Slide Masters, you can create a question layout, and then use it to make questions. This way, you can save yourself a lot of time and give all questions in your game a consistent look and feel.
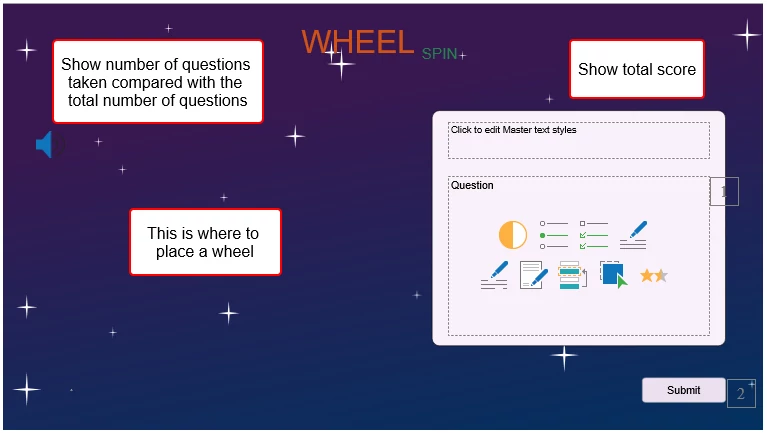
In the question layout, you’ll resize the question placeholder and move it to the right side as shown below. You should insert a shape and place it below the title and question placeholder (Home tab > Arrange > Order or Format tab > Order, select Send to Back or Send Backward). This way helps increase the appearance of question on the slide. The left side is where to place a wheel. I’ll talk about designing and working with the wheel in the following parts of this tutorial.
Besides, the question layout has an audio as the sound of the wheel spinning. You ‘ll keep the audio from playing by using Initially Hidden (right-click the audio icon on the Canvas or select the audio Time Bar in the Timeline pane > Initially Hidden). After that, use actions to play it (Show Object) and pause it (Hide Object) when the wheel rotates.
Added to that, you’ll show number of questions they’ve taken compared with the total number of questions in the game on the left corner of the question layout. On the right corner, you’ll show the total score learners get each time they give a correct answer. To have these things, you need to create variables and work with references to display these variable values.
- To show the former, use system variables: apQuizTakenInteractions and apQuizTotalInteractions. You don’t need to create new ones.
- To show the latter, you need to add a new variable called total.
Do as follows:
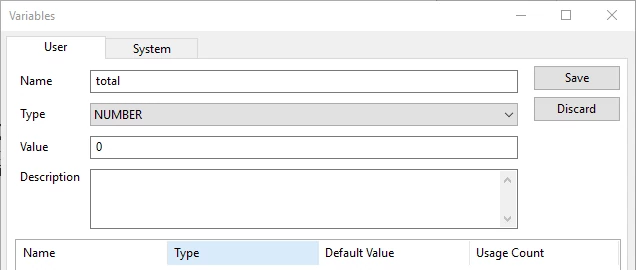
Step 1: In the Home tab > Variables to opens the Variables window. This window has two tabs: User and System. In which, the System tab contains system variables.
To create the total variable, in the User tab, specify the variable name, type, initial value, and description (if any). Regarding type, you’re given three variable types: TRUE/FALSE, TEXT, and NUMBER. In case of the total variable, select the NUMBER type.
Step 3: Use variable references to retrieve and display your desired data in the question slides. Just insert text-based objects. Then, in the Home tab > Reference to add variable references. Below is an example of the total variable reference. Notice that each variable reference appears in text as a placeholder that contains the variable name getting enclosed within two percent signs (%).
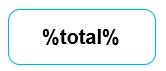
In doing so, the corresponding values are shown in the output like this.
Note: Since ActivePresenter displays the actual values of the variables they reference, you should adjust the text caption’s size according the size of values. The length of references has nothing to do with the text caption’s size.
4. Add Interactions to Question Placeholder
When you stop the wheel, a question appears and the game pauses for you to answer the question. Once you select an answer and click the Submit button, a message appears and an audio plays to show you whether the answer is correct or incorrect.
- If the answer is correct, the score you get from the current question will add up to the total score, and you see number of questions you’ve taken compared with the total number of questions in the game.
- In case of the incorrect answer, you get no score.
However, no matter what the result is, you’ll be allowed to do the next spin. It’s because when you click the Submit button, the Stop button always turns into the Spin button. If you don’t select an answer but click the Submit button, a hint message is displayed to ask you to answer the question first.
To create all of these interactions, you need to pause the presentation until learners click the Submit button (Interactivity tab > General > Pause presentation to wait for user input > Just before hiding object). In addition, you’ll work with three events of the question (On Correct, On Incorrect, and On Incomplete). Also, execute some JavaScript when the slide starts and when learners give a correct or an incorrect answer.
The interactions are explained as below:
- When the question slide starts: The Onload event occurs and execute the following script. Here you need to create a location variable first. Then, use this script
prez.object('WHEEL').rotate(prez.variable('location'));to get the rotation state of the wheel back when a new question slide plays.
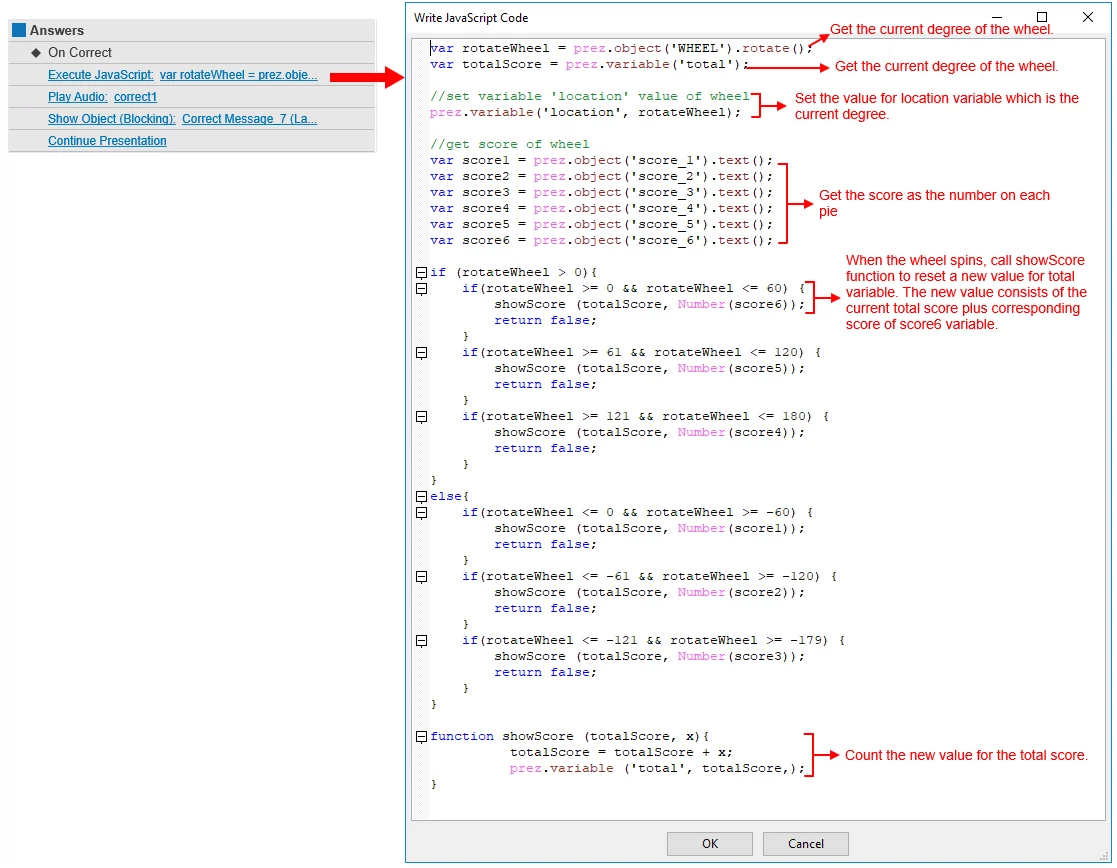
- When learners click the Submit button and give a correct answer: The On Correct event occurs and execute a script. This script gets the score as a number on the selected pie and calculates the total score which a learner has achieved. At the same time, the On Correct event also triggers the Play Audio action to play the “correct1” sound, the Show Object action to show the correct message, and the Continue Presentation action to allow learners to do the next spin.
var rotateWheel = prez.object('WHEEL').rotate();
var totalScore = prez.variable('total');

//set varaible 'location' value of wheel
prez.variable('location', rotateWheel);

//get score of wheel
var score1 = prez.object('score_1').text();
var score2 = prez.object('score_2').text();
var score3 = prez.object('score_3').text();
var score4 = prez.object('score_4').text();
var score5 = prez.object('score_5').text();
var score6 = prez.object('score_6').text();

if (rotateWheel > 0){
    if(rotateWheel >= 0 && rotateWheel <= 60) { showScore (totalScore, Number(score6)); return false; } if(rotateWheel >= 61 && rotateWheel <= 120) { showScore (totalScore, Number(score5)); return false; } if(rotateWheel >= 121 && rotateWheel <= 180) {
        showScore (totalScore, Number(score4));
        return false;
    }
}
else{
    if(rotateWheel <= 0 && rotateWheel >= -60) {
        showScore (totalScore, Number(score1));
        return false;
    }
    if(rotateWheel <= -61 && rotateWheel >= -120) {
        showScore (totalScore, Number(score2));
        return false;
    }
    if(rotateWheel <= -121 && rotateWheel >= -179) {
        showScore (totalScore, Number(score3));
        return false;
    }
}

function showScore (totalScore, x){
          totalScore = totalScore + x;
          prez.variable ('total', totalScore,);
}
- When learners click the Submit button and give an incorrect answer: The On Incorrect event occurs and executes a JavaScript function which gets the rotation state of the wheel. At the same time, this event triggers the Play Audio action to play the incorrect sound, the Show Object action to display the incorrect message, and the Continue Presentation action to allow learners to do the next spin.
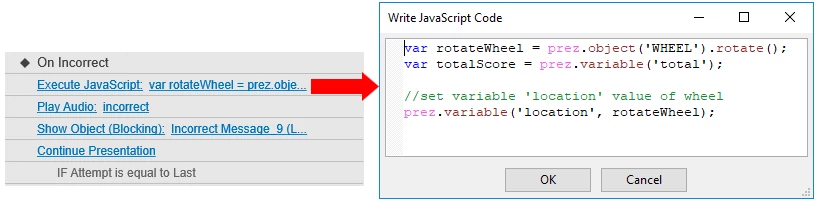
var rotateWheel = prez.object('WHEEL').rotate();
var totalScore = prez.variable('total');

//set varaible 'location' value of wheel
prez.variable('location', rotateWheel);
- When learners don’t give an answer but click the Submit button: The On Incomplete event occurs and triggers the Show Object action to show the hint message.

Step 2. Design an Interactive Wheel
Notice that the Start Game slide and all question slides have a wheel. But the difference is the wheel in question slides is interactive. With this in mind, the best strategy is design a wheel in the question layout early on. Then, copy it to the Start Game slide. For question slides, use the question layout to create them.
To make the wheel in the question slides spin, you need to create an interactive timeline. The procedure is much like when you create the TimelinePulse timeline to make star objects twinkle. After that, work with conditional actions and variables to control the behaviors of the Spin button. Regarding variables, you can create new variables using the Variables window (Home tab > Variables). Then, access the Properties pane > Events – Actions to add variables and conditional actions to the Spin button.
1. Make a Wheel
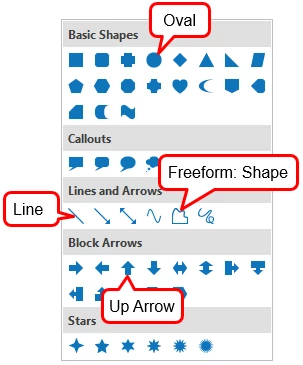
Generally, a wheel includes a base, pies with numbers, an arrowhead, and the Spin button in the center. You can make all of them using shape objects without any external resource. All you need is Oval, Line, Arrows, Freeform Shape, and Text Caption. To see these shapes, in the Home tab or Annotations tab > Shapes.
Regarding the Spin button, you need to place it in the center of the wheel. At the beginning, it is labelled with SPIN which learners click to make the wheel rotate. Then, SPIN is turned into STOP. With these in mind, use an Oval shape with two states (SPIN and STOP) to create this button.
Take the following steps to create a 6-pie wheel. Mind that you can divide the wheel into as many pies as you want. In this case, remember to update actions (including JavaScript) to ensure the game works.
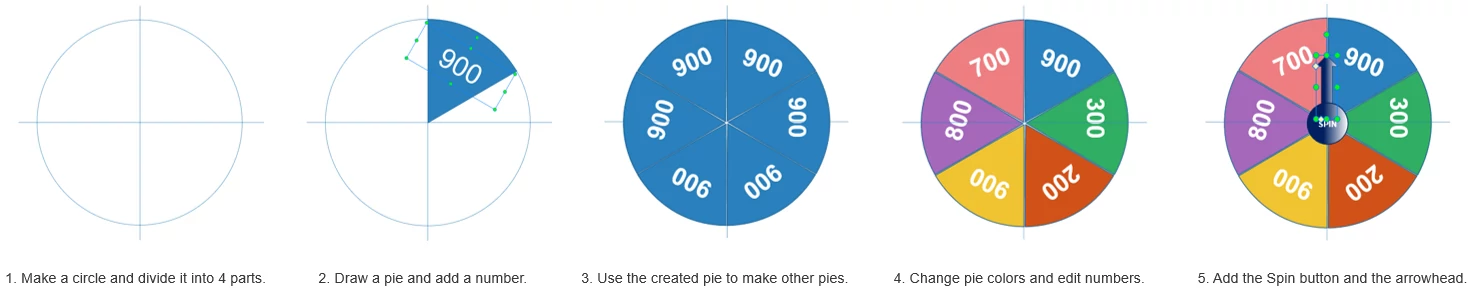
To smooth this process, pay attention to these:
a. Draw a pie
Notice that the wheel has 6 pies with equal angles (each of 60 degrees). You just need to create a pie. Then, copy and paste this pie to get others.
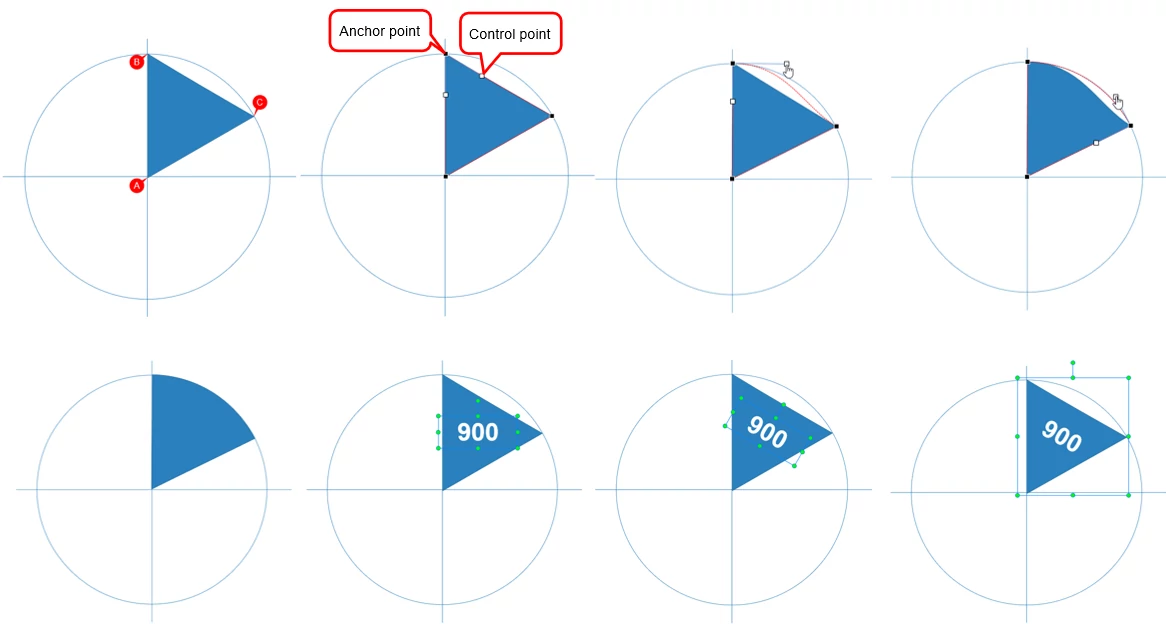
To make a pie, use Freeform Shape to draw an equilateral triangle. In doing so, press SHIFT to constrain the angle to 600. Next, use control points (right-click the equilateral triangle > Edit Points > anchor points > control points) to turn the chord into an arc. After that, use Text Caption to add a number. At this point, remember to rotate the number by 300 (Properties pane > Size & Properties > Transform > Enter 30). Finally, group the pie and the number into a single object called PIE.
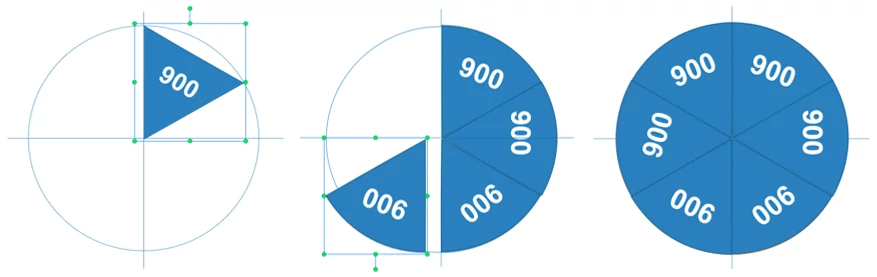
b. Draw other pies
To draw five other pies, copy and paste the PIE object five times. Rotate each of the new pies by the degrees: 600, 1200, 1800, 2400, and 3000. Then, arrange them into a complete wheel. You can change colors and numbers for pies. After that, group all PIE objects into a single object. Name this group as WHEEL.
2. Make Wheel Spin
To make the wheel spin, just add an animation effect. Here you also need to create an interactive timeline like when you insert animation effect into star objects. Do as follows:
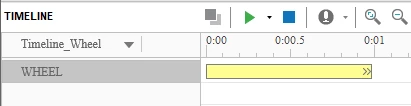
Step 1: Add a timeline and name it as Timeline_Wheel.
Step 2: Select the Wheel object group and add the Spin effect to it. Then, make the effect repeat until the end of the slide (double-click the effect Time Bar > Repeat > Until end of Slide).
3. Make Spin Button Work
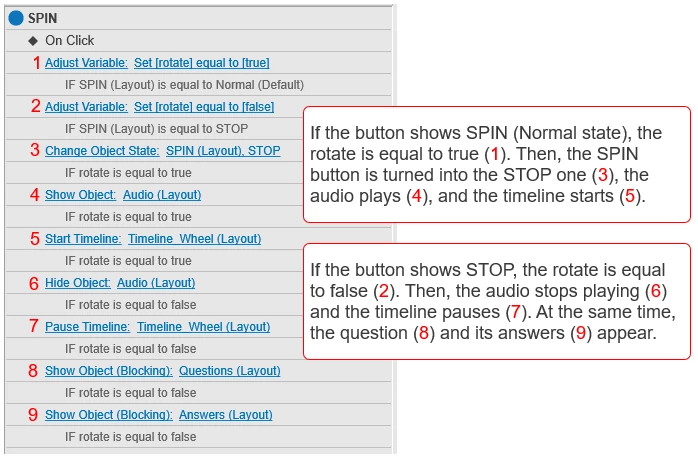
Recall that when you click the Spin button, there are three things that happen: the Spin button immediately turns into the Stop button, the wheel starts rotating, an audio plays. When the wheel is rotating, if you click the Stop button, the wheel stops rotating, the audio stops playing, a question with its answers appears.
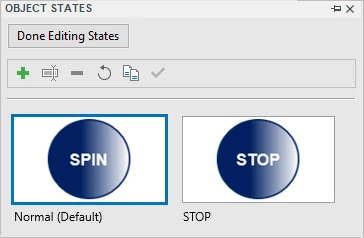
So, to get these interactions, first add two states for the Spin button: Spin state as Normal state, and Stop state. At the same time, you need to create the rotate variable. This variable is meant for controlling the wheel and audio. Its initial value is TRUE.
Let’s learn the procedure.
Step 1: Create a multi-state Spin button. This can be done using Object States (View tab > Object States).
Step 2: Work with the Variables window to add the rotate variable. The procedure to do this is similar to when you create the total variable as explained earlier.
Step 3: Add events – actions to the Spin button. Mind that the Adjust Variable action aims at adjusting the rotate and stop variables to true/false to make the wheel rotate or show the question and answers. Besides, specify multiple IF>THEN>ELSE conditions to determine whether or not an action gets executed.
Now you’ve created a solid foundation to make a great wheel spin game. Let’s switch to the Normal View (Slide Master tab > Close Master View) and continue to create an Start Game slide, a Game Over slide, and a question pool.
Step 3: Create Start Game and Game Over Slides
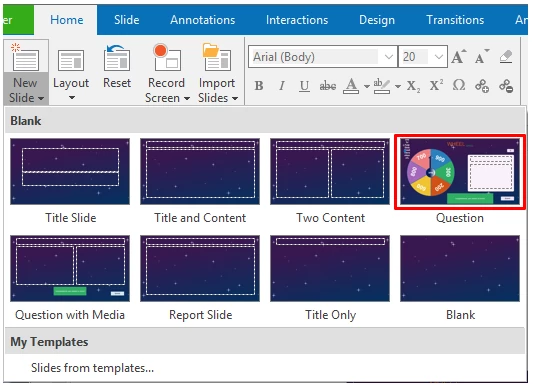
Using Slide Masters, you’ve designed slide layouts to create slides. In the current project, insert two blank slides (Home tab > New Slide > Blank) to make an Start Game slide and a Game Over slide. Then, add titles, shapes, animation effects, etc. to beautify them. Remember to copy the wheel spin in the Slide Master and paste it into the Start Game slide.
In fact, there is not much to do with the Start Game slide and a Game Over slide. However, there are two things you need to bear in mind. First, how to play an audio automatically when the Start Game slide appears. Second, how to create Start and Play Again buttons.
1. Make Welcome Music Autoplay When Start Game Slide Appears
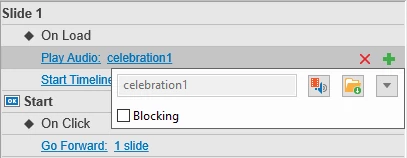
There is a sound which automatically plays when the Start Game slide appears. The idea is you’ll use the On Load event, add the Play Audio action, and attach an audio to the action.
To do this, select the Start Game slide. Then, in the Properties pane > Interactivity > Events – Actions > On Load > Add Action > Play Audio.
2. Create Start and Play Again Buttons
The Start Game slide has the Start button, and the End Game has the Play Again button. Make these button works by adding events and actions to them (Properties pane > Interactivity > Events – Actions).
Note that you need to pause the game until learners click the Start and Play Again buttons (Properties pane > Interactivity tab > General > Pause presentation to wait for user input > Just before hiding object).
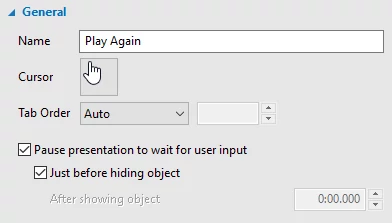
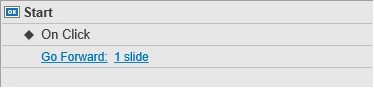
a. Start: In the Start Game slide, when you click the Start button, you’ll jump to the first question of the game which is the second slide. Add the On Click event and Go Forward action with a one-slide jump.
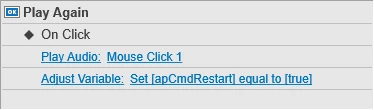
b. Play Again: When you click the Play Again button, you’re given a chance to play the game again. Add the Adjust Variable action to adjust the apCmdRestart system variable to true to restart the game. Besides, the Play Again button has a sound effect. To insert this sound, use the Play Audio action and add a built-in sound (Mouse Click 1) to it.
Step 4. Create a Question Pool
It’s easy to see that all questions appear randomly each time you play the wheel spin game. If you want to randomize questions like this, just create a question pool. To do that, first, add question slides. Then, bring them to a slide pool. Finally, use random slides to draw questions from the pool.
Since you’ve created a question layout previously, making question slides now becomes a piece of cake.
1. Insert Question Slides
To create question slides, do the following:
Step 1: In the Home tab or Slide tab > New Slide > select the question layout.
Step 2: Click the Multiple Choice question icon in the question placeholder to create this question. Then, select any radio button to set the correct answer.
Step 3: Make the question and answers invisible until learners spin the wheel and stop it to select a score. Do this by right-clicking the question title and answers > Initially Hidden.
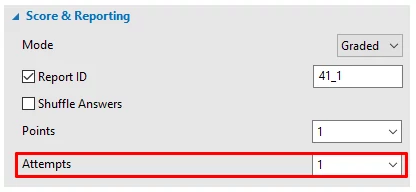
Step 4: Set the maximum number of attempts that learners could make (Properties pane > Interactivity > Score & Reporting > Attempts. In the case of this game, set 1.
Step 5: Copy and paste the newly created question slide to get the three others. Then, just change the text of question titles and answers.
2. Randomize Questions
Once you’ve had five question slides, take further steps to create a question pool. Then, draw question slides from this pool using random slides to create a randomized game. Do as follows:
Step 1: In the View tab > Slide Pools. By default, ActivePresenter gives you Pool 1.
Step 2: Right-click all question slides > Move Slide To > Pool 1.
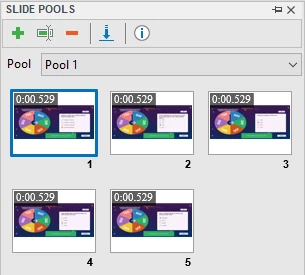
Step 3: Insert 5 random slides into the current project (Slide tab > Random Slide). Place them below the Start Game slide and above the Game Over slide. By default, these random slides are linked to pool 1. So, your job’s done here.
Step 5: Preview and Export the Game Project to HTML5
It’s time to preview what you’ve created and check if everything pleases you. To do this, use the HTML5 Preview feature. Then, if you’re satisfied with the game project, just export it to HTML5.
1. Preview the Game Project
To preview the game, in the Home tab or Export tab > HTML5 Preview.
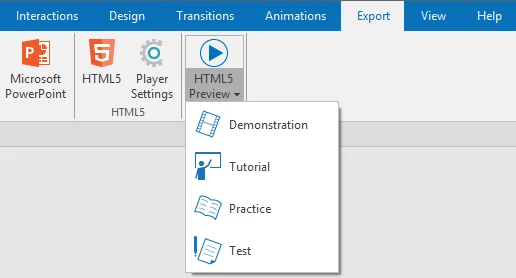
There are four operation modes: Demonstration, Tutorial, Practice, and Test. You can select any of them to preview and interact with the game, except Demonstration. This mode isn’t interactive but only viewable.
2. Export the Game Project
In ActivePresenter, the HTML5 output (Export > HTML5) uses HTML5 standards, which means learners can view and interact with contents on the web. Most importantly, regarding this output format type, you can customize the player skin before exporting (Export > Player Settings).

So, if you want to embed your game into a webpage like the screenshot below, exporting the project to HTML5 is a very good choice.
Here are some notes to remember:
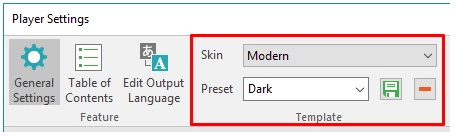
- Use skin and template presets to quickly change the look of the player toolbar.
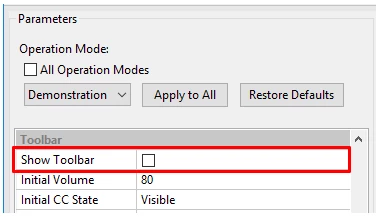
- If you don’t want to show the player toolbar, just hide it (Player Settings > General Settings > Parameters > Toolbar > clear the Show Toolbar check box).
- Remember to select Tutorial, Practice, and Test if you let learners play the game. As said earlier, the Demonstration mode is viewable only.
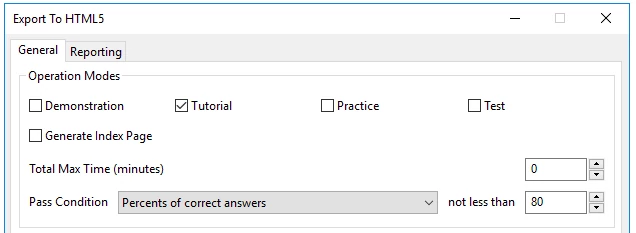
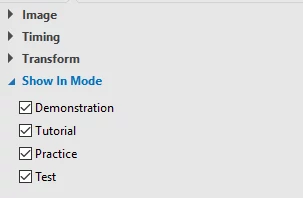
- If the mode of any object is different from the mode which you select in the Operation Modes section of the Export tab, that object will be not shown. So, it’s better to select all modes for any object (Properties pane > Size & Properties > Show In Mode). Mind that modes of some objects are automatically selected.
At this point, you finish the process of creating a wheel spin game. You can free your creativity by using gamification techniques to increase learner engagement. For example, you can create a leaderboard which features learners’ avatars and their results. This leaderboard also shows the achievement of other learners. All of these things can be done with ActivePresenter. So, don’t miss it out!
There you have it – an ultimate guide to create a wheel spin game with ActivePresenter. Try it today, and let us know what you think. In case you have any problem, don’t hesitate to contact us.