ActivePresenter 9 provides users with two ways to customize mouse cursor and cursor effects in captured videos. Thanks to that, you can now show/hide the mouse effects or adjust its click sound, shape, color, etc. Learn more through today’s article.
It will be easier for viewers to follow your actions if you use the mouse cursor with effects in captured videos. ActivePresenter allows users to customize the mouse cursor and mouse effects before and after the recording phase. Let’s explore these ways, respectively:
- Enable recording mouse cursor and cursor effects before recording
- Customize mouse cursor and cursor effects after recording
Enable Recording Mouse Cursor and Cursor Effects Before Recording
Here are the steps to do that:
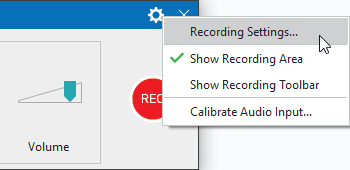
Step 1: Click the Settings button (the Gear icon) in the Record Screen as a Video Project dialog > select Recording Settings….
Step 2: Navigate to the Cursor tab of the pop-up dialog > Select the Record Mouse Cursor checkbox (1) in the Cursor Settings section.
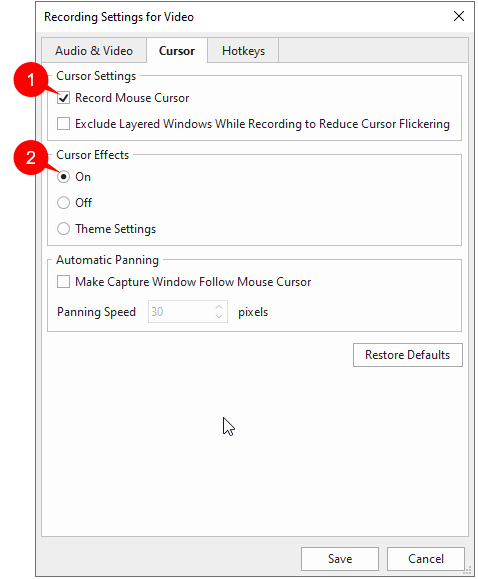
By doing so, ActivePresenter will record the mouse movement on the screen which makes it easier for the viewers to follow your steps. In case you don’t select this check box, your video will not have a mouse movements record.
For more detailed information about this dialog, kindly refer to the article Work with Recording Settings dialog in ActivePresenter.
Step 3: Select On in the Cursor Effects section > click Save. This way, the mouse movements in your video will have full effects. Otherwise, you still can change it in your captured videos. By default, the Off option is selected.
Next, let’s come to the second way to customize your mouse cursor in mouse click in captured videos in ActivePresenter 9.
Customize Mouse Cursor and Cursor Effects After Recording
After completing the first task and have your own recorded video. So, to customize the video’s cursor effects, do the following:
Step 1: Select the captured video > navigate to its Properties pane > Media tab > Cursor Effects section.
Step 2: Select the Render Cursor checkbox (3) to activate all the cursor properties.
In case you don’t select this check box, the cursor will not appear in your recorded video.
Step 3: Modify mouse cursor effects properties.
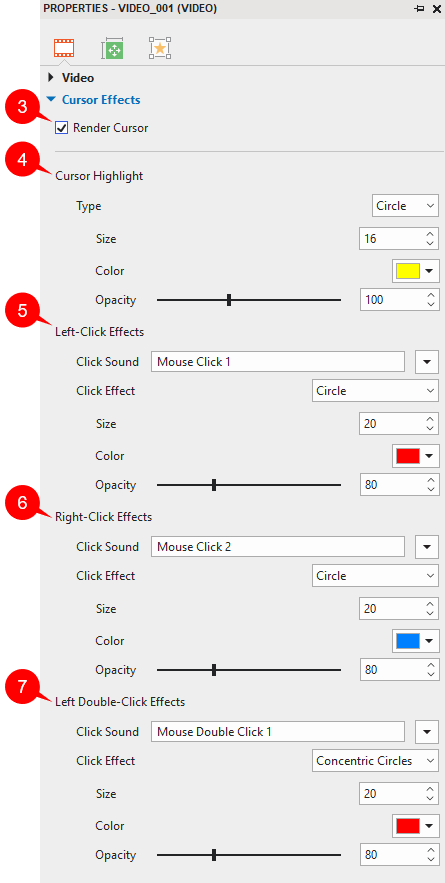
- Cursor Highlight (4): Highlight the cursor.
- Type: Type of highlight effect (None, Circle, and Square).
- Size: Size of the highlight effect. It is the radius of the circle in the Circle highlight or half of the width of the square in the Square highlight.
- Color: Color of the highlight. Click the Color Picker split button to change the cursor highlight. You should use some attention-grabbing colors such as red, yellow, and green for better effect.
- Opacity: Transparency of the highlight. Drag the Opacity slider to change the Opacity level. Nevertheless, don’t make it too low because it can be hard to follow.
- Left-Click Effects (5)/Right-Click Effects (6)/Left Double-Click Effects (7): Play a sound and render an animation when the mouse is left-clicked, right-clicked, or left double-clicked.
- Click Sound: The sound which is played when a mouse button is pressed. Click the Click Sound arrow button and select one soundtrack from the drop-down list. Besides, it is possible to import an audio file from your computer or other projects.
- Click Effect: The animation effect (None, Circle, Concentric Circles, and Square) is rendered when a mouse button is pressed.
In addition, the properties of the click effect (Size, Color, and Opacity) are the same as those of the cursor highlight.
Conclusion
So, now you know two ways to customize the mouse cursor and cursor effect in recorded videos before and after recording. Hope that it helps. Visit our Tutorial, Twitter, Facebook page, or YouTube channel to get more interesting information. And don’t forget to download the latest version of ActivePresenter here:

Related articles: