This today’s topic is around eLearning games. You’ll learn the design and development of the ActivePresenter Millionaire Quiz. Keep reading and create your very own version of the famous game show Who Wants to be a Millionaire.
But wait, have you downloaded the app ActivePresenter? If not, simply click the following button and install the software freely on your Windows or macOS now before getting to know step by step how to create this Millionaire Quiz!

From Playing to Creating: Millionaire Quiz
How to Play?
In this eLearning game, learners have to answer all 15 multiple choice questions correctly to win one virtual million dollars. The questions are divided into three levels with increasing degrees of complexity. The more questions learners answer, the more money they win. No time limit. One wrong answer means losing everything. Quit at any time to start over.
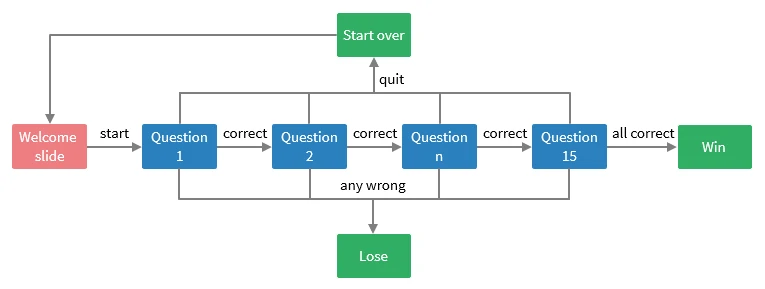
How to Create?
Everything begins with a blank slide. Then, you’ll go to the slide master view to design the template resembling the actual Who Wants to be a Millionaire game show. You’ll create all the graphics with lines, shapes, and freeform drawings and use built-in sounds for click effects. Thus, no external resource required.
There will be 18 slides in total: the Welcome, Failure, Congratulations, and 15 multiple choice question slides. The questions are increasingly difficult and come at random. For that to happen, you’ll work with slide pools and random slides.
The animation work won’t cost you a lot of time because you just deal with animation loops in the Welcome and Congratulations slides. What takes time and effort is build all the interactions with actions and JavaScript. You want to control the behaviors of the buttons, the answers, the questions, the bank (the money won), and the money tree.
The key to working on this eLearning game is split it into smaller chunks. You will:
- Create the Question Template
- Make the Welcome, Failure, and Congratulations Slides
- Make the Question Slides and Build the Interactions
- Randomize Questions
- Export the Project to HTML5
Step 1: Create the Question Template
In this big step, you’ll give your entire project a uniform background and create the template for the questions. In the template, you’ll add states to objects so that you can build the interactions afterward.
1. Create the Question Template
You’ll work with the slide master to give all the slides the same background and all the questions the same template. In the current project using the Blank theme, do the following:
Step 1: Open the slide master view (View tab > Slide Master).
Step 2: Select the master layout and choose any dark background style (with white fonts) using gradient fill. Then, modify the gradient fill as you want. The changes will affect all the layouts in the hierarchy.
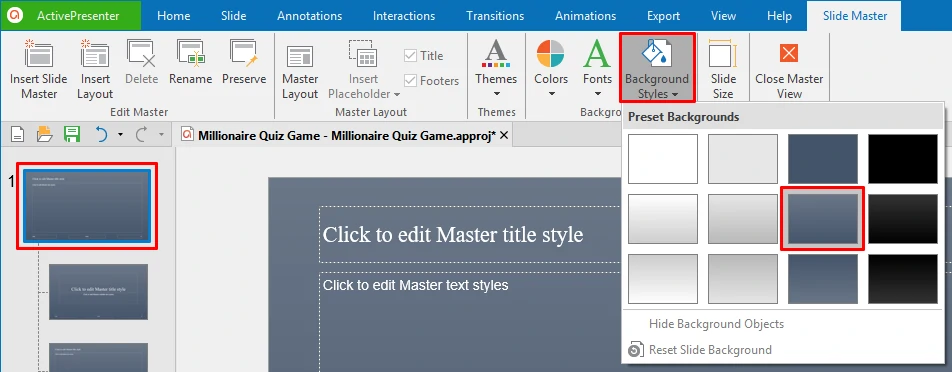
Step 3: Select any layout to design the question template with ready-made shapes, freeform drawings, text captions, and interactive buttons. In this example, the Title Slide layout is chosen.
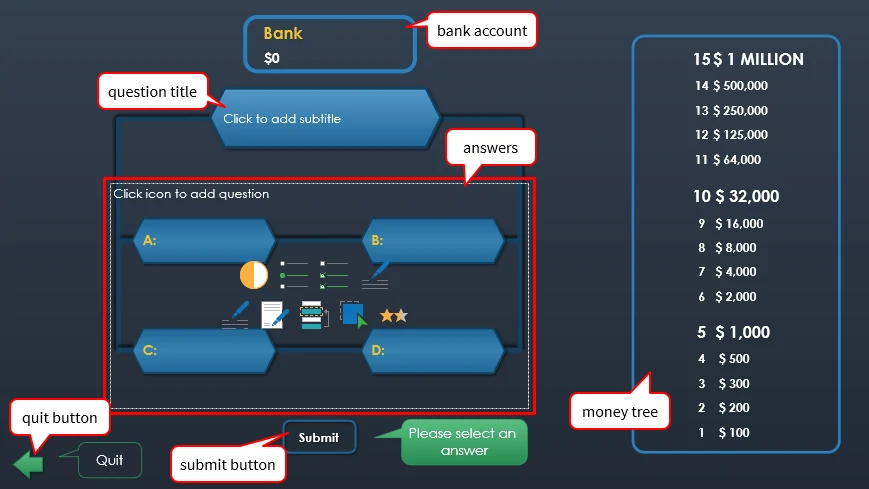
Take note of the following:
- Change the title placeholder to a hexagon and the Quit button to a left arrow (Format tab > Change Shape).
- Hide two messages for the Quit and Submit buttons (Properties pane > Size & Properties > Timing > Initially Hidden).
- Insert the question placeholder to add questions in the normal view (Slide Master tab > Insert Placeholder > Question).
- Leave four hexagonal answers and the money tree for the next part (concerning multi-state objects).
Step 4: Add animation entrance effects (Fly In) to the title and the question placeholders. Delay the start time of both a bit so that the title and the question will appear in turn after the slide starts.

At this point, there are two tasks left in the slide master: add states to objects and add actions to the Quit and Submit buttons. The former will be discussed right below while the latter will be saved for the second big step.
2. Create Multi-State Objects
You want this Millionaire Quiz eLearning game to look like the actual game show. That is, each multiple choice question will come with four hexagons labelled by A, B, C, or D, not four radio buttons. Do a trick to get that. You’ll use multiple choice questions with “invisible” radio buttons (text excepted). Place each radio button exactly above each hexagonal answer in the background. That way, learners will interact with the invisible radio buttons while seeing the multi-state hexagons.

For each hexagon, add three states: Hover (appears when being rolled over), Selected (appears when being clicked), and Correct (appears when being a correct answer). Adding and editing object states are done in the Object States pane (View tab > Object States).
Take note of the following:
- Work on one hexagon. Once you get it ready, copy and paste it to get the three others. This will both save time and ensure all hexagons have consistent states.
- Object states are about the “look”. When a slide has several multi-state objects, make sure similar states of different objects look harmonious in some way. For example, the Hover states of the buttons and the answers must somewhat “agree” with each other.
Regarding the money tree, you’ll add one other state to each value, namely the Highlight state. This state will appear to highlight the current question and the corresponding prize. In the following figure, you see nothing in the Normal state because it uses a transparent background (No Fill, No Line) and white text.
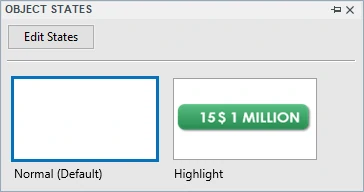
Besides, give the answers and the values in the money tree descriptive and consistent names because later you will use them to build the interactions. For example, name the values Value 1, Value 2, Value 3,…, Value 15 one after another in an ascending order.
Step 2: Make the Welcome, Failure, and Congratulations Slides
In this big step, you’ll make the Welcome, Failure, and Congratulations slides. Switch to the normal view (Slide Master tab > Close Master View) and work with slides. Then, insert Blank slides (Home tab > New Slide > Blank) and unleash your creativity. Once the “visual” part gets ready, add animation effects and make all the buttons work.
1. Design the Slides
All the graphics, including shining banners, spotlights, and a group of audience, are going to be created by you yourself in ActivePresenter. Make use of ready-made shapes and freeform drawings. For example, you’ll use a rounded rectangle and many circles to create the banner. Then, use freeform shape to draw two spotlights that shine at the banner. Fill the spotlights with gradient color to make them real.
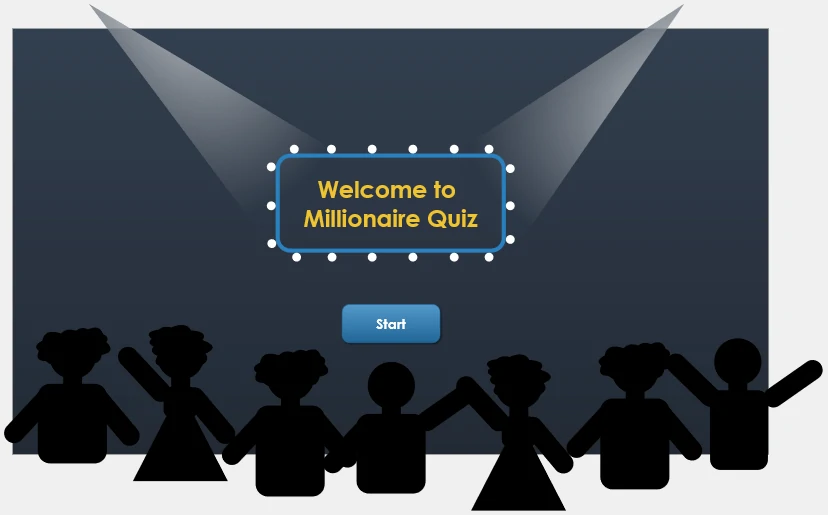
The audience needs more creativity. For example, to create a female audience, grab a circle, a triangle, and a few rectangles. Don’t forget a cloud callout to give her curly hair. Set up all the pieces and group them into a single object to move and animate them together (right-click objects > Group > Group).
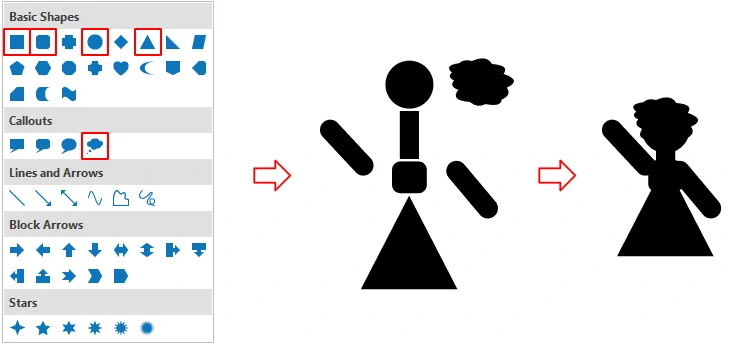
Take note of the following:
- Copy and paste similar objects and slides to save time.
- Open the Selection pane to easily manage child objects in a group (View tab > Selection).
- Arrange the slides in the order: the Welcome, Failure, 15 question slides (added later), and Congratulations. This order is important when you want to navigate the quiz and create other interactions (explained later).
- You may want to save your own graphics for reuse by using object templates.
You’ve done creating the “look” of the slides. The next part is about the “feel”.
2. Create Animation Loops
To create animation effects, select an object, click the Animations tab, and choose the effect you want. This is what you do to create animation effects in the slide master and the Failure slide. But when it comes to the Welcome and Congratulations slides, things go to another level. In both slides, all the effects happen endlessly: the flashing spotlights and bulbs around the banner, the continuous money rain, and the swinging audience. To get animation loops like this, you need interactive timelines and actions.
The idea is pause the slide with a button and make the effects in the interactive timeline repeat until the slide ends. Then, trigger an action which calls that timeline when the slide starts. That way, the effects will play in a loop until you click the button and go to another slide.
In the Welcome slide, do the following:
Step 1: Create an interactive timeline and name it Loop (Timeline pane > Timeline list box > Add Timeline).
Step 2: In the Loop timeline, add an emphasis effect (Pulse) to the spotlights and bulbs. Make the effects repeat until the end of the slide (double-click the effect time bar > Repeat > Until end of Slide).
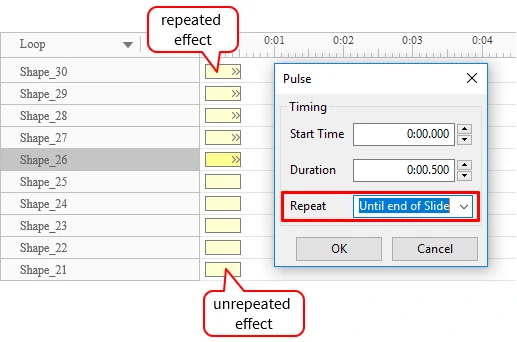
Step 3: Add the On Load event and the Start Timeline action to the slide (Properties pane > Interactivity > Events – Actions).

In the Congratulations slide, you’ll use motion paths to animate the money and the audience. Regarding the motion paths for the audience, select Auto-reverse to automatically reverse the paths, making the swinging effect.
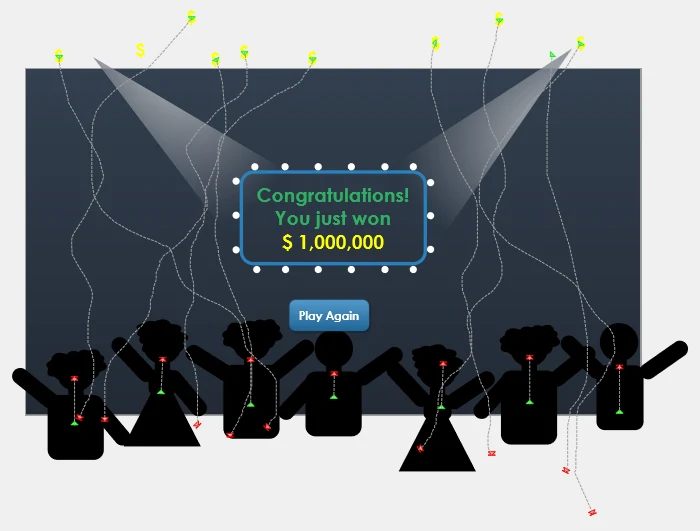
3. Make the Buttons Work
This eLearning game has five buttons coming from three types: navigation (the Start button), retry (two Play Again and the Quit buttons), and submit (the Submit button). Make the buttons work by adding events and actions to them (Properties pane > Interactivity > Events – Actions).
Take note of the following:
- All the buttons have a click effect using the built-in sound Mouse Click 1.
- The presentation will be paused until learners click the Start and Play Again buttons (Interactivity tab > General > Pause presentation to wait for user input > Just before hiding object).
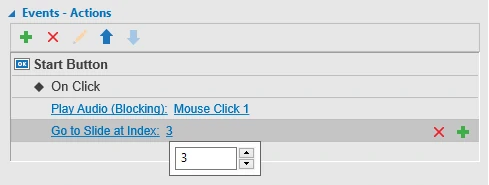
a. Navigation: In the Welcome slide, clicking the Start button takes you to the first question of the quiz, which is the third slide (below the Welcome and Failure slides). Add two actions to the On Click event, as shown below:
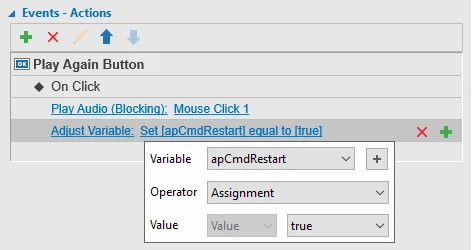
b. Retry: You need to work with the system variable apCmdRestart to create the Play Again and Quit buttons. The Adjust Variable action will adjust this variable to true to restate the quiz.
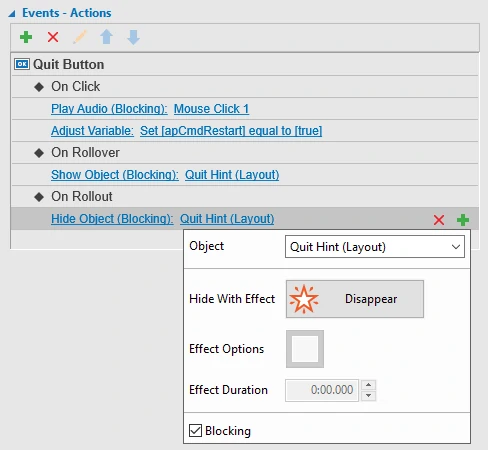
For the Quit button, apart from restarting the quiz, you want a hint message to appear when you hover over the button. Thus, switch to the master view and add two other events: On Rollover and On Rollout (occur when the mouse enters and leaves the button, respectively).
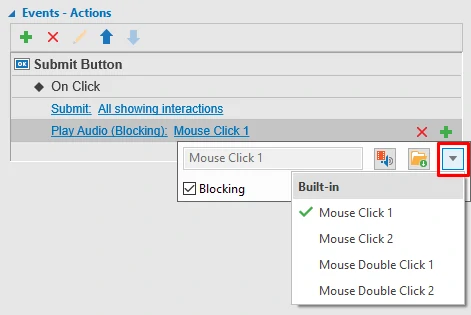
c. Submit: The Submit button submits the learner answers to evaluate.
At this point, you’ve done creating the Welcome, Failure, and Congratulations slides. The next step is make the question slides and make your game interactive.
Step 3: Make the Question Slides and Build the Interactions
At the beginning of the workflow, you’ve designed the question template in one layout of the slide master. Now is the time to use that layout to make the question slides. The best practice is insert one question slide, edit it, create interactions, and then copy and paste it to get the other slides.
1. Make the First Question Slide
You’ll insert a new slide using the question template you’ve already created (Home tab > New Slide > Title Slide). Now get it “visually” ready by performing the steps:
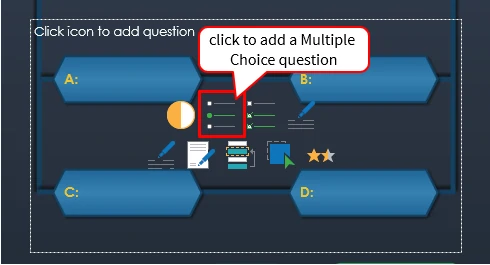
Step 1: Click the Multiple Choice icon in the question placeholder. A multiple choice question is added with four radio buttons.
Step 2: Set the maximum number of attempts to 1 so that learners can try the question once (Properties pane > Interactivity > Score & Reporting > Attempts > 1).
Step 3: Arrange the radio buttons so that each button places exactly above each hexagonal answer. To do that, select the question and click the Properties pane > Size & Properties > Group Layout > Mode > None. Now you can freely resize and reposition each radio button.
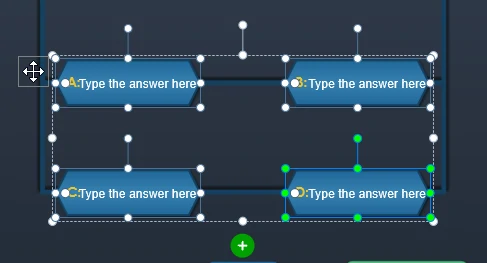
Step 4: Make all the states of the radio buttons invisible (text excepted). To do that, in the Object States pane > Edit States to enable the edit mode. Next, select each state of a radio button and click the Format tab, make all related properties transparent.

Now, type the question and answers for the first question slide. Remember to set the correct answer by double-clicking one of the already-invisible radio buttons. There is a good trick for you. Double-click the correct answer and notice the Default state in the Object States pane. The Default state of the correct answer will be the Normal Checked.
2. Control the Behaviors of Answers
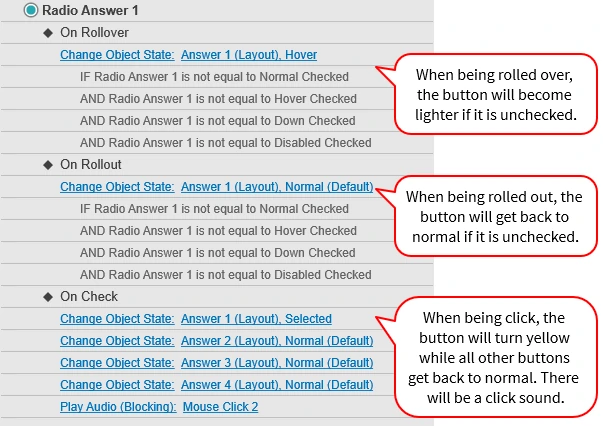
As explained earlier, learners will interact with the invisible radio buttons while seeing the multi-state hexagons. Thus, you’ll add events to the radio buttons to control the appearance of the hexagons. You’ll work on three events: On Rollover and On Rollout (for the hover effect) and On Check (for the click effect).
The effects work as follows:
- Hovering over an unselected answer makes it lighter (the Hover state). The selected answer remains yellow (the Selected state).
- Clicking an answer turns it to yellow. A click sound plays.
- The answers are mutually exclusive just like radio buttons in a multiple choice question.
Below are the interactions added to one radio button:
3. Assess the Questions
In this part, you’ll work on three events including the On Correct, On Incorrect, and On Incomplete to assess the questions. The idea is add events and actions to the first question slide (the model), and later on, when you copy and paste this question slide to get the 14 other questions, just update the actions.
The interactions are as follows:
- When learners give either a correct or an incorrect answer: The On Correct/On Incorrect event occurs and triggers three actions. They reveal and highlight the correct answer and continue the already-paused presentation.
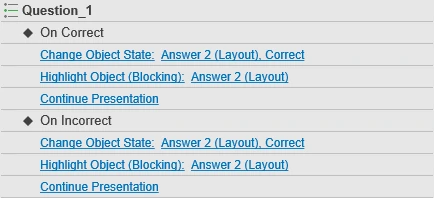
By default, the question is paused just before hiding. But in this case, because the highlight effect takes time, you need to prolong the duration after the slide continues and before it ends.
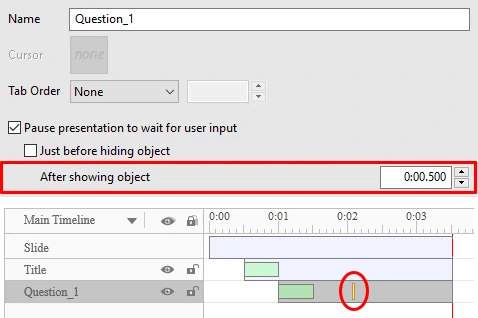
- When learners click the Submit button without giving answer: The On Incomplete event occurs and triggers the Show Object action to display the Submit Hint message.

4. Create the Remaining Interactions
You’ll execute some scripts at the beginning and end of the question slides (when the On Load and On Unload events occur, respectively). You’re recommended to write the scripts in the Project Properties dialog > Event tab (ActivePresenter button > Project > Properties). That way, you’ll find it more convenient to edit them at any time.
- When the question slide starts: The On Load event occurs and executes the prez.loadQuiz() function. This function gets the total score, then uses it to highlight the corresponding value in the money tree and calculate the total sum in the bank.

if (!prez.loadQuiz) {
    prez.loadQuiz = function() {
        var score = prez.variable('apQuizScore');
        if (score !== undefined) {
            for (var i = 1; i <= 15; ++i) {
                var objectName = 'level ' + i;
                var object = prez.object(objectName);
                if (object) {
                    if (i == score + 1) {
                        object.state('Highlight');
                        object.animate(AP.EffectType.PULSE, 500);
                    } else {
                        object.state('Normal');
                    }
                }
            }

            // Money
            var arrMoney = ['$ 0', '$ 100', '$ 200', '$ 300', '$ 500', '$ 1,000',
                            '$ 2,000', '$ 4,000', '$ 8,000', '$ 16,000', '$ 32,000',
                            '$ 64,000', '$ 125,000', '$ 250,000', '$ 500,000', '$ 1 MILLION'];
            var moneyObject = prez.object('Money');
            if (moneyObject) {
                moneyObject.text(arrMoney[score]);
            }
        }
    }
}
- When the question slide ends: The On Unload event occurs and executes the prez.unloadQuiz() function. This function gets the total score and calculates whether the learner passed or failed. If the learner passed, he’ll move on to the next question. Otherwise, he’ll jump to the Failure slide.
if (!prez.unloadQuiz){
    prez.unloadQuiz = function() {
        var score = prez.variable('apQuizScore');
        if (score !== undefined && score != 15) {
            var passed = prez.currentSlideIndex() - 1 == (score + 2); // Include 3 first slides
            if (!passed) {
                prez.showSlideAt(2); // Failure slide
            }
        }
    }
}
At this point, you’ve done creating the model question slide. Now copy and paste it to get the 14 others. As the game is increasingly difficult, divide 15 questions equally into three levels: easy, moderate, and difficult. Then, change the question and answers in each slide. After that, change the correct answers and modify related actions.
Step 4: Randomize Questions
You want your eLearning game to be dynamic. Five easy questions come first, and next are five moderate questions following by five difficult ones – but all questions should appear at random. For that to happen, you’ll use slide pools and random slides.
You’ll create three slide pools of increasing difficulty and move question slides into corresponding pools. After that, insert 15 random slides into your project to draw questions randomly from the pools. Perform the following:
Step 1: Open the Slide Pools pane (View tab > Slide Pools).
Step 2: Pool 1 already exists. Click Rename to rename it to Level 1. It’ll be the less difficult pool containing the first five easy questions.
Step 3: Click Add to create the two other pools. Name them Level 2 and Level 3.
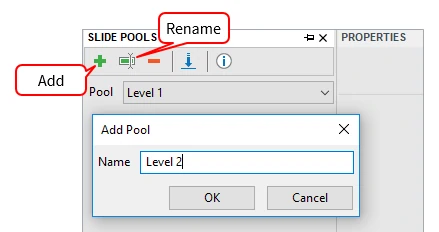
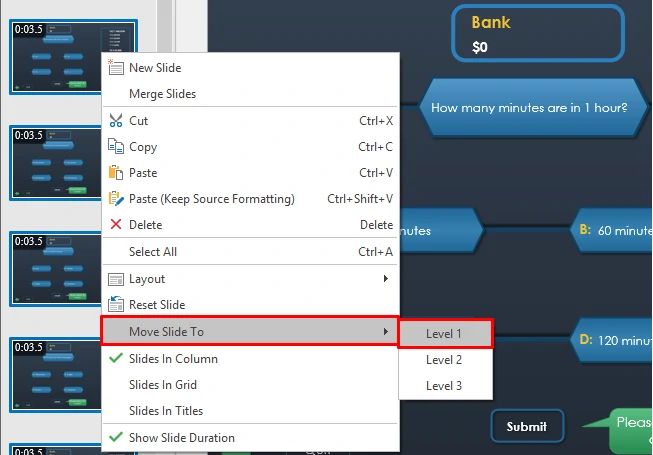
Step 4: Move five easy, five moderate, and five difficult questions into the Level 1, Level 2, and Level 3 pools, respectively. Do that by right-clicking the question slides > Move Slide To > Level 1/2/3.
Step 5: Insert 15 random slides into the project (Slide tab > Random Slide). Place these random slides below the Welcome and Failure slides and above the Congratulations slide.
Step 6: Draw questions from pools. In the Slides pane, select the first five random slides, click the Properties pane > Slide Properties > Linked Pool > Level 1. Similarly, link the next five random slides to the Level 2 pool and the last five random slides to the Level 3 pool.

As a side note, you can make your game more unpredictable by adding more questions to each pool while still pulling five questions from the pool.
At this point, you’ve mostly completed the journey. The last tasks are previewing your game and exporting it.
Step 5: Export the Project to HTML5
In this last big step, you’ll preview your game to make sure it work properly and then export it.
1. Preview the Project
Previewing the project during and after the edit process allows you to review your work and notice any required changes. In the tabbed toolbar, click HTML5 Preview and choose either the Tutorial, Practice, or Test mode. Don’t preview in the Demonstration because this mode is viewable only.
2. Export the Project
Once you’re sure of your work, export it to HTML5 (Export tab > HTML5). You can also choose to pack the project into a SCORM/xAPI-compliant package so that you can upload the package to an LMS. Before exporting, you may want to customize the player (Export tab > Player Settings).

Let’s say you want to embed your eLearning game into a WordPress post or page just like this. As can be seen, there is no player toolbar or any kind of assessment. The quiz is just for entertaining. To get the *.html output like that, take note of the following:
- Hide the player toolbar in all operation modes (Export tab > Player Settings > Clear the Show Toolbar check box).
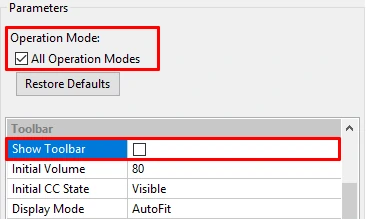
- Export the project in either the Tutorial, Practice, or Test mode. In this case, these three modes function the same. Don’t use the Demonstration because this mode is not interactive but only viewable.
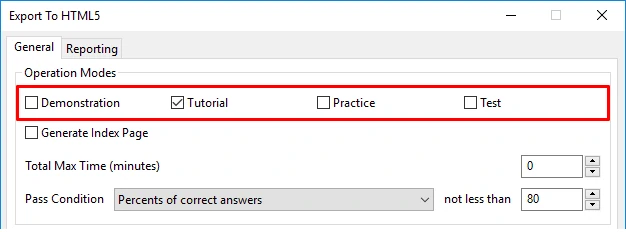
Besides, you can use your Millionaire Quiz as a learning tool in game-based learning. For example, the quiz can act as a prior knowledge recall at the beginning of a lesson, or a challenging mini-quiz inside another lesson. In this case, you’d better pay more attention to grading and reporting methods. You need to determine the pass/fail condition for the quiz, set the time limit if you want it to be a test, and so forth. That said, the first and foremost thing to consider is the questions themselves – they must be relevant to the learning topic and align with the course objectives.
ActivePresenter Makes eLearning Games Easy!
That’s how we design the Millionaire Quiz. Now it’s your turn. Free your creativity and make your very own version. Create a host, add a time limit, aid learners with the four so-called lifelines, and so forth. ActivePresenter can handle all things for you. Give ActivePresenter a try and don’t forget to share your work with us.
