If you need to hide private or sensitive information such as identity or email address in videos, you can use the Blur effect feature in ActivePresenter 9. It helps to blur not only static but moving objects in videos.
In the scope of this article, we’ll show you how to work with the Blur effect in ActivePresenter 9. Let’s get started now!
Apply Blur Effect to Video
To apply the Blur effect to video, take the following steps:
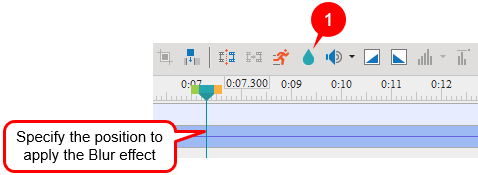
1. Select the video object (in the Timeline or on the Canvas).
2. In the Timeline pane, place the Playhead at the timestamp where you want to apply the blur effect.
3. Click the Insert Blur Area button (1). Remember that this button is only activated when you select the video object and specify the Playhead.
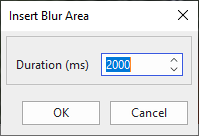
Then, the Insert Blur Area dialog is opened to let you specify the blur duration > click OK. You can also change this value later.
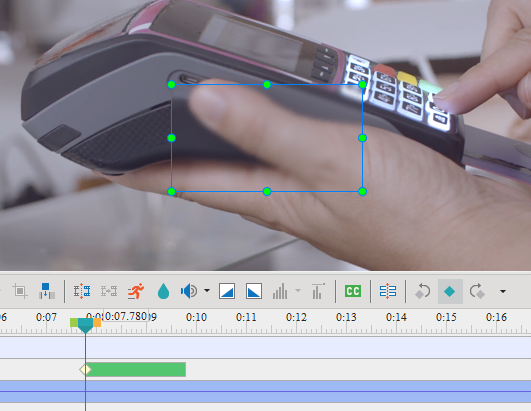
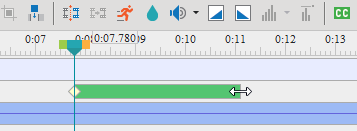
After that, you will see a blur area on the Canvas and an object time bar (green bar) in the Timeline pane.
Customize Blur Area and Effects
After adding a Blur effect to video, you are free to edit it as follows:
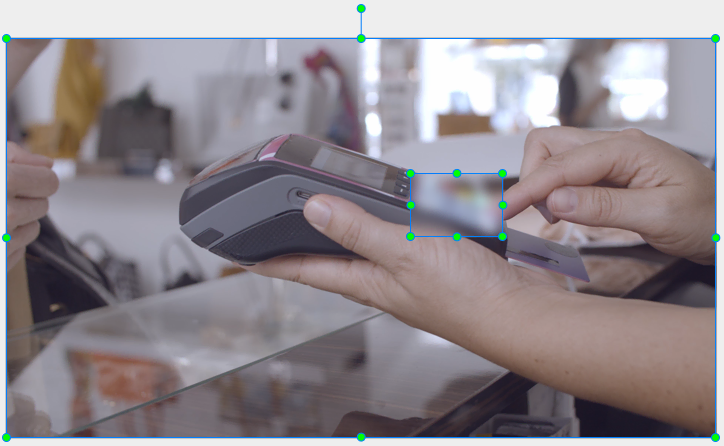
- Change the size and position of the blur area by dragging the green handles on the Canvas.
- Change the blur effect properties by accessing the Blur Effect section in the Properties pane > Media tab.
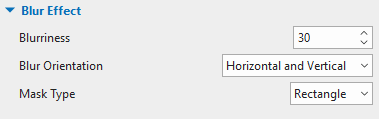
| Blurriness | Specify the amount of the blur. The higher value, the less detail of contents. |
| Blur Orientation | Specify the orientation of the blur (Horizontal and Vertical, Horizontal, and Vertical). |
| Mask Type | Specify the shape of the blur area (Rectangle or Ellipse). |
- Change the start time of the blur effect by dragging the object time bar to another position in the Timeline pane. Besides, drag the right-side edge to the left or right to change the duration of the effect.
Note: You can insert more than one blur effect into a video.
Blur Moving Objects in Video
In case the video has the target object that maintains the same size and position, you only need to change the start time and duration of the blur effect. Otherwise, if the target object is moving, you need to insert more keyframes to cover it more precisely. The more keyframes you insert, the more exactly the blur area covers the moving object.
Now, to add more keyframes, here are the steps:
1. Select the blur time bar in the Timeline pane.
2. Seek the Playhead along the timeline and stop at each position you want to add a keyframe.
3. On the Canvas, move the blur area to another position if needed to cover the object. Each time you do that, a white keyframe will appear at the Playhead position.
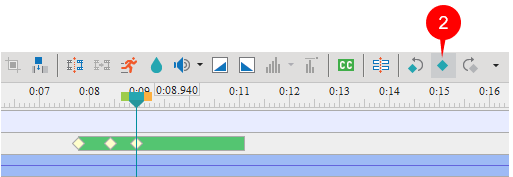
Alternatively, you can click on the Add/Remove Keyframe button (2) in the Timeline pane to insert keyframes manually.
Remove Keyframe/Blur Effect
To delete the keyframe/blur effect, you drag the keyframe/green bar downward until it turns gray and release the mouse button.

Note: If you select the blur area on the Canvas and press DELETE, you will remove the entire video as well. So, don’t do that.
So, that’s the must-know procedure to blur moving objects in videos with ActivePresenter 9. Hope that this helps.
Download the app and try this feature for free!

See also: