ActivePresenter is known to be an easy-to-use screen recorder and powerful eLearning authoring tool. The integration of these two useful functions in ActivePresenter 7 allows you to quickly capture your screen and create eLearning content with just simple steps. In a word, working with ActivePresenter, you will walk through the procedure of recording, editing and exporting projects.
Record: Capture every action on the screen in any size and position with or without Full Motion.
Edit: Edit captured videos/slides. Import files (videos, images, etc.) and edit them with many powerful tools.
Export: Export your works to a wide variety of output formats such as videos (MP4, MKV, AVI, FLV, WebM, WMV), images, HTML, documents (Microsoft PowerPoint, Word, Excel, PDF) and HTML5.
This guide is dedicated to those who have just getting started with ActivePresenter 7. It covers basic as well as essential features that a newbie should know to not only get started but to get the most out of ActivePresenter. To be specific, this is a user-purpose oriented work, (guide for users who want to create interactive demonstrations and simulations or eLearning contents) so you will find the desired information depending on what you use ActivePresenter for. There are many advanced features which are not included in this paper, yet you can still watch the videos and read articles about them in our tutorial series.
This tutorial covers:
Create Interactive eLearning Contents
Record Screen
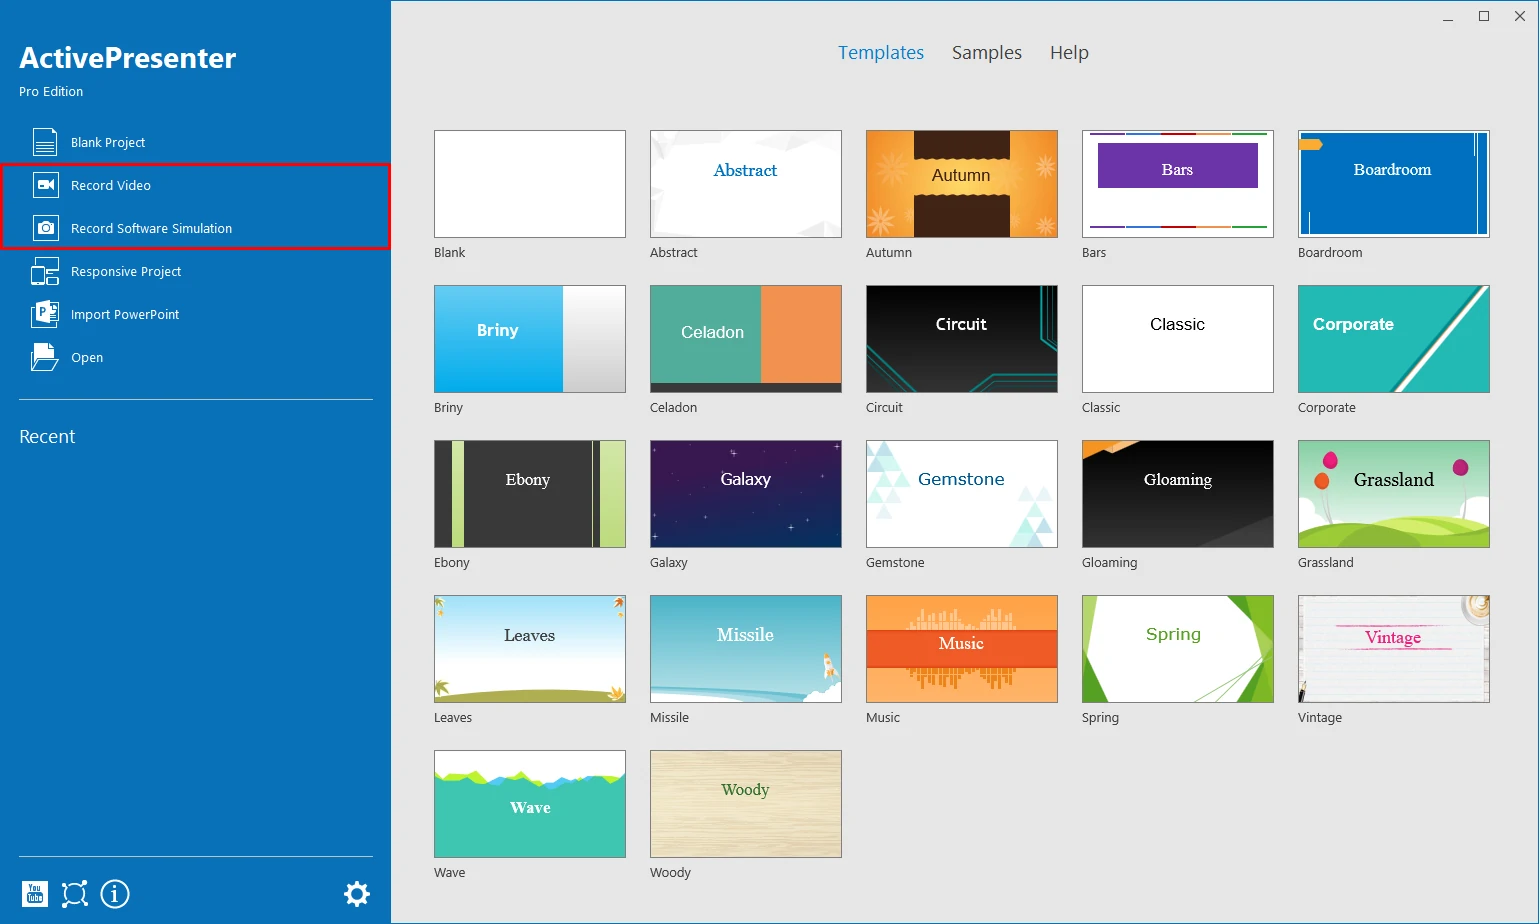
When you first launch the app, right on the Start Page, select Record Video for creating a video demonstration or Record Software Simulation for creating an interactive simulation. These two recording options are also available in the editor. You can click ActivePresenter button to select one of them and start recording a new project. Or, select them from the Home or Slide tab to capture screen as one or multiple slides in the current project.
Record Video Demonstration
You can use ActivePresenter to record the computer screen to create a video demo to show how your products or services look like. A recorded project captures truthfully all live actions on screen along with mouse and keyboard actions while you are interacting with the target application. ActivePresenter allows you to record narration, audio system and webcam, also.
For more information, see Record video demonstrations with ActivePresenter.
Record Software Simulation
Creating Software Simulation is a great way to show others how you practice an application or software engagingly and lively. Using this feature, you will have a project containing a series of slides describing how to achieve a specified purpose with the application you are capturing.
For more information, see Creating software simulations
Create Interactive eLearning Contents
On the other hand, if you want to create interactive eLearning contents, you may want to create a new blank project from scratch. Of course, you can still capture your screen and use it in eLearning projects when needed.
Now, let’s get started by clicking Blank Project and start your journey. ActivePresenter will automatically open a new project with blank slides for you to add contents in.
If you have related PowerPoint slides or images that you want to utilize in ActivePresenter, use Import PowerPoint or Image Project. Talking about this, ActivePresenter allows you to import PowerPoint slides into the ActivePresenter project that you are currently working with or as a completely new project. Then you can edit them just like you are working on the PowerPoint slides.
Record with ActivePresenter
Now, let’s come to the recording part in detail. Whether it’s a recording video demonstration or a software simulation, they share things in common:

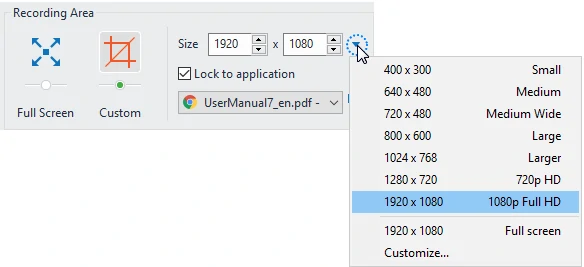
Choose Capture Area
- Choose to record your screen in either full or custom dimension.
- When it comes to custom dimension, you can set any captured size by adjusting the capture frame size and position.
- You can also choose one of many preset sizes that ActivePresenter offers.
- Lock ActivePresenter capture frame to the recorded application if needed.
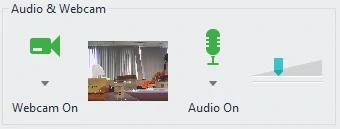
Record Audio and Webcam
- Click Audio to turn this recording option on, then further select to record microphone and Audio system. You can drag the volume scale to change the recording volume.
- Click Webcam to enable Webcam recording. This option is available for Record Video only.
Set Recording
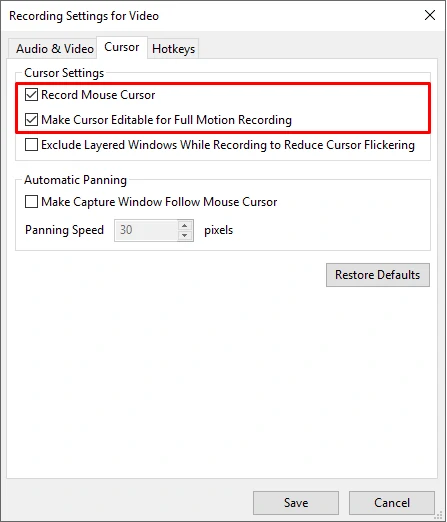
- For more recording settings, click the gear
 icon, then select Recording Settings. This option allows you to set audio and video, cursor, hotkeys and annotation.
Note: Ensure to enable two options: Record Mouse Cursor and Make Cursor Editable for Full Motion Recording in the Cursor tab if you want to record mouse cursor and edit them after recording.
- When you finish all the settings, click the Record button to begin.
Finish Recording
- When you finish recording, press hotkey Ctrl + End to stop.
- Or you can access the ActivePresenter icon placed at the bottom right corner of your screen, then click Stop in the dialog that appears.
For more information, see How to start and stop recording in ActivePresenter 7.
Edit with ActivePresenter
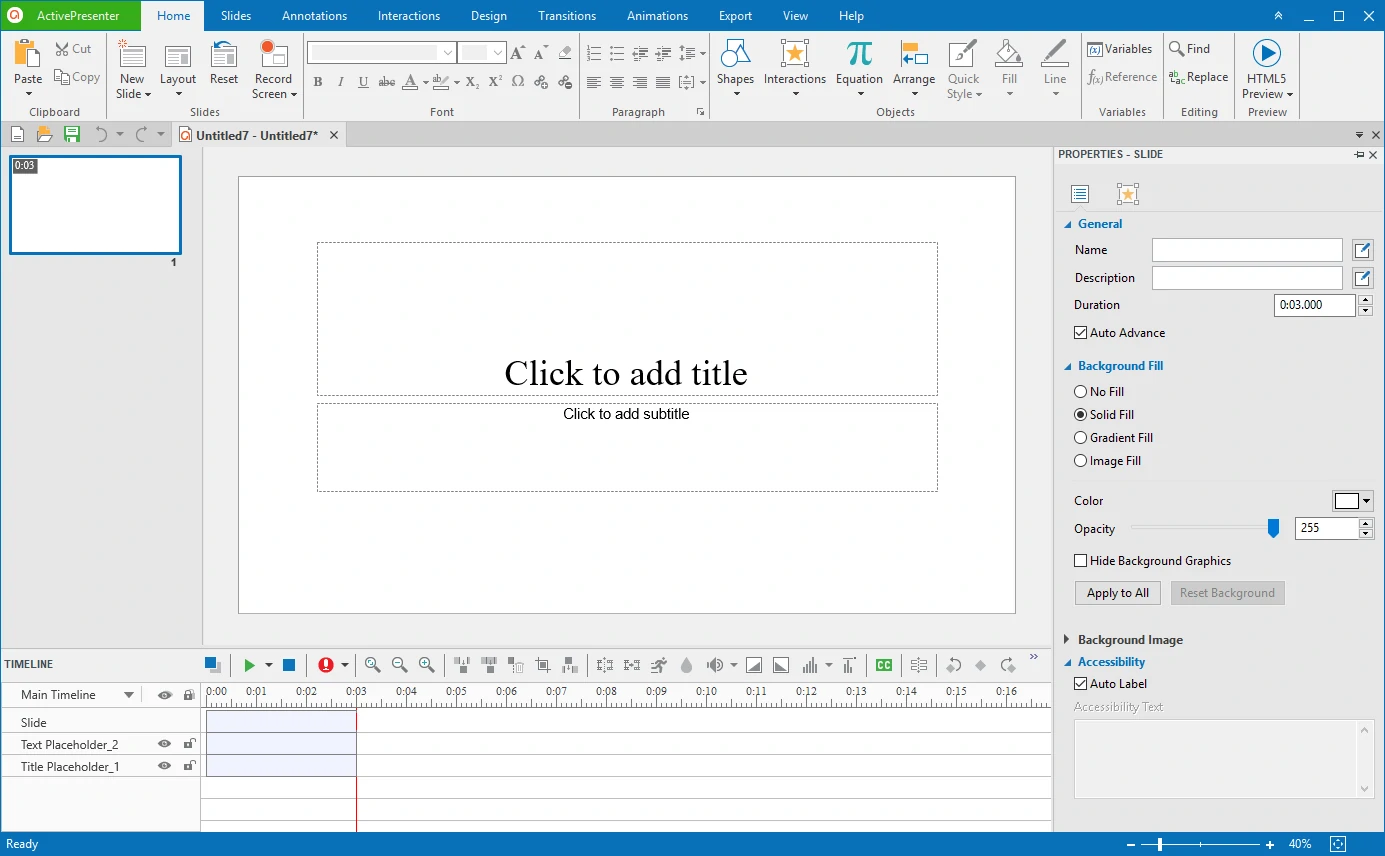
After finishing the record, ActivePresenter will automatically transfer your work into the editing screen with a very clear and easy-to-navigate user interface.
ActivePresenter User Interface
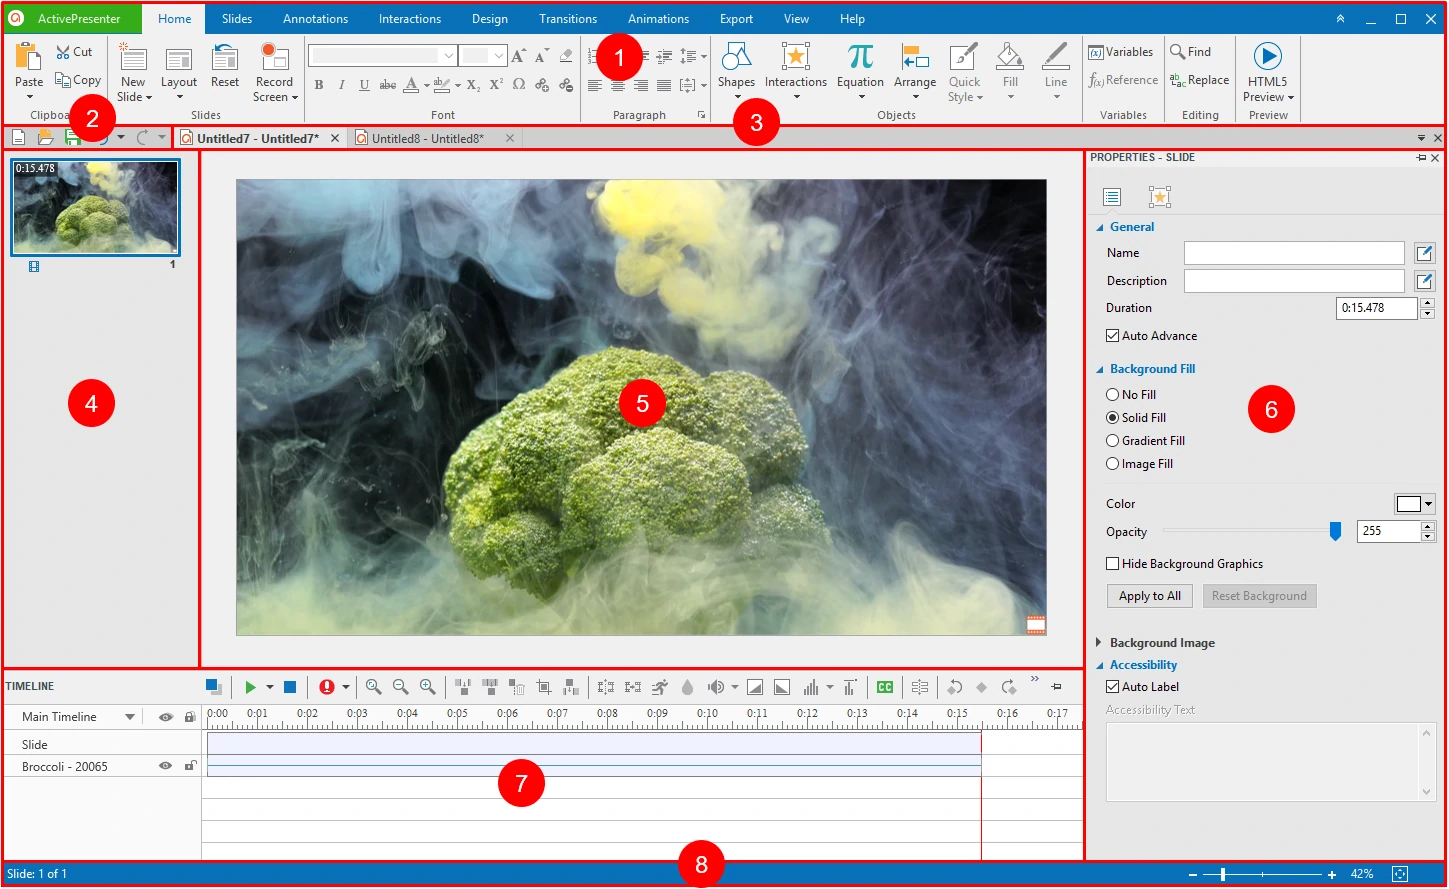
1. Tabbed Toolbar
Tabbed Toolbar is positioned at the top of the screen having many tabs. Each tab contains a group of relevant activities. Generally, most tabs like Home and Slide are visible all the time, except some contextual tabs such as Format and Drawing. They only appear when you are working with a particular object which can be edited using special options. During the editing process, you will work mainly with the Annotations and the Interactions tab because they have almost tools and options to magnify your work.
- Annotations
You can insert any in the wide range of annotations into your project such as shape, text caption, highlight, spotlight, and zoom-n-pan by clicking on the object icon that you wish.

For example, a spotlight or a highlight is used to draw the audiences’ attention to a specific part of the screen while closed captions are added to make your video more explainable. In addition, you can use the Zoom-n-Pan tool to focus on a particular part of the screen instead of the whole one. All of them together will enhance your videos and make them look much more professional.
Besides, if you want to use the Picture in Picture effect in ActivePresenter, you can insert other videos into your captured one. By doing that, you could have your own video played while the recorded video is displaying to explain or to describe more visually what’s happening on the screen.
- Interactions

The Interactions tab contains various types of interactive objects that you could use, especially in creating contents that require user responses such as eLearning courses or interactive software simulations. Because those kinds of objects can interact with users in pre-specified manners. Use 9 types of interactive questions to create interesting quizzes. You can track and mark the learners’ result if needed.
2. Quick Access Toolbar
It contains the New, Open, Save, Undo, and Redo command.
3. Document tabs
Document tabs navigates between opening documents. Hover over this tab to view the location of the project file (displayed in a tooltip).
4. Slides pane
It is placed on the left of the screen. It contains all slides (each slide can be a step of the procedure or can be a video) that you created.
You can change the slide name and position, copy, paste, add new or remove slides from here with ease. The latter part of this article called Edit Captured Videos and Slides will indicate the way you can work with them.
5. Canvas
It is placed at the center of the working screen. It shows all the objects, captured scenes and effects that you insert in.
In any occasion that you want to zoom in to see more clearly a specific part of the Canvas, you can use the zoom scale at the bottom right corner of the working screen. Or you can hold CTRL and scroll the mouse up/down to zoom in/out the Canvas, also.
And click the Zoom Fit ![]() icon to have the Canvas fitted with the proper size of the editing screen.
icon to have the Canvas fitted with the proper size of the editing screen.
6. Properties Pane
Properties pane is on the right side of the editing screen contains all the attributes of the object(s) that you are working with, namely slides, shapes, images, videos, etc. For clarification, as soon as you select any shape on the Canvas, the Properties pane will show all the attributes of that shape in terms of color, style, timing and transition effect, etc. Just access the attribute that you want to adjust and change it from here.
7. Timeline Pane
It is located at the bottom of the working screen. It shows all the objects of the slide that are displaying on the Canvas along with their timeline bars. Note that Multiple Timelines is now available.
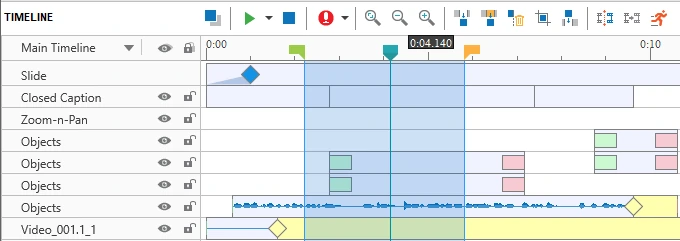
The Playhead shows the current timestamp of the objects that are displayed on the Canvas. It has a green Start Marker and yellow End Marker; you can drag them along the Timeline to select a range. After that, you can apply any command (such as cut, crop, insert freeze-time, etc.) to that selected range.
You can zoom in/out the Timeline to work more easily and exactly with objects and their timestamp. Just click the Zoom in/Zoom out/Zoom Fit ![]() icon. Or you can hold Ctrl while scrolling the mouse up/down to zoom in/out. Also, right-click in the Timeline and select Waveform Bar Height to set it larger.
icon. Or you can hold Ctrl while scrolling the mouse up/down to zoom in/out. Also, right-click in the Timeline and select Waveform Bar Height to set it larger.
NOTE: When you specify a range without selecting any object, ActivePresenter will automatically apply the command you choose to that range along with all the objects inside.
On the other hand, if you select a range, and select one or some objects, the commands you use will, in fact, apply to that range along with those selected objects only. Other unselected objects will not be affected.
8. Status Bar
The Status Bar is at the bottom of the editor. It shows the status of the current project. In addition, this bar also offers some certain functions.
Edit Captured Videos and Slides
As said above, the captured videos and slides will be placed in the Slides pane at the left side of the editing screen. In order to have another slide viewed on the Canvas, just click to select it in the Slide Pane. As soon as you select the new slide, the Canvas will show that one and you just need to add contents in.
Added to that, you can insert any video and audio file with different formats from your computer in ActivePresenter to edit. That means, you won’t need any other supplementary software to edit videos anymore. Below are some of the most usually used options that a beginner should know.
1. Delete Slides
In creating a simulation, a slide may be a step of a procedure that you have made. There are possibilities that you made mistakes in some steps and you need to delete them without affecting other parts of the project. Luckily, you can delete slides containing those steps.
To delete any slide, just select it and press the Delete key on your keyboard. Hold Ctrl while clicking to select multiple slides and delete multiple of them at once.
2. Split a Slide
It’s easy to split a slide into different smaller slides. First, choose the timestamp where you want to split the slide, then click the Split Slide ![]() icon.
icon.
Remember that all the objects (shapes, images, videos, etc.) in the original slide will also be split at the timestamp that you choose. The latter part of the split slide will be moved to a new separated slide.
3. Change Slide Position/Order
Normally, ActivePresenter arranges all slides in the Slides Pane in the order of recording steps that you have made, however, you can still change that sequences by simply clicking and dragging the slides up or down to new positions.
4. Cut, Delete, Copy Video Ranges
In recording a video demonstration, you may want to delete some captured video parts that don’t contain needed information or parts that you made mistakes. Select that range and click the Cut or Delete icon. The selected range will be deleted, and the remaining parts will be automatically joined together.
Similarly, if you want to copy any range of the captured video, just select that range and click the Copy Range icon. After copying the range, you can paste it in the same slide containing the original video or a new slide by simply clicking Ctrl + V.
For more information, see our tutorial about advanced video editing: Cut, Copy, Delete or Crop Range.
5. Split and Join Videos
ActivePresenter allows you to split a video into as many parts as you want. And vice versa, you can join many pieces of videos into a single video. Select the timestamp and click Split or Join icon.
You can refer to the tutorial How to Split and Join Videos to have a closer look at how to do that.
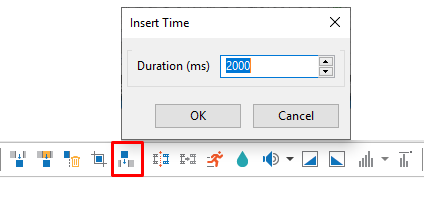
6. Insert Time to Videos
This tool is critically helpful when you want to have more freeze time for your videos so that you can add some clarifications or explanations on.
To do that, select the range and click the Insert Time icon and specify the duration in the pop-up dialog.
 For more information, see How to freeze a frame.
NOTE: ActivePresenter will insert time at the position of the Playhead, so you should place it at the target timestamp.
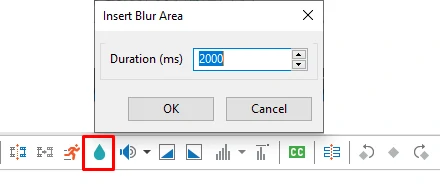
7. Blur Moving Objects in Videos
Hiding sensitive information, even if it’s moving, is not difficult with ActivePresenter. Select video range containing object/information that you want to hide, then click the Insert Blur Area icon and specify blur duration.
With the moving object, you will need to add more keyframes to blur it exactly. We have a detailed tutorial about blurring moving objects in videos, let’s come and take a look.
NOTE: Ensure to select the video object whether on the Canvas or in the Timeline pane to enable the blur effect feature. Otherwise, the blur icon will not be available to use.
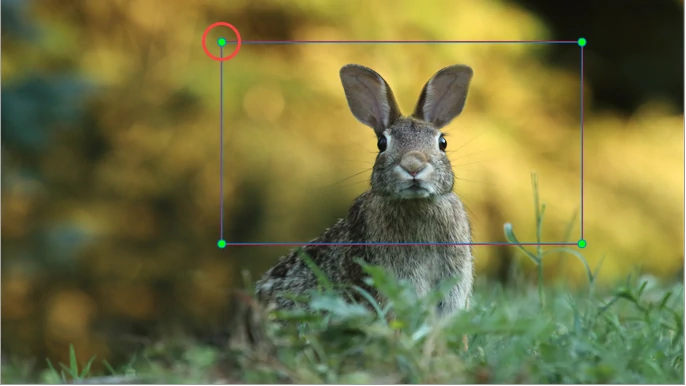
8. Focus on Objects with Zoom-n-Pan
The Zoom-n-Pan is very useful when you want to draw your audiences’ attention to a specific part of the screen. Normally, you should insert one Zoom-n-Pan to zoom in, and insert another Zoom-n-Pan (scale to cover the whole screen) to zoom back to normal size.
After the Zoom-n-Pan appearing on the Canvas, you can drag one of four green handles to adjust the zoom scale.
Let’s come and check out the tutorial Working with Zoom-n-Pan for more details.
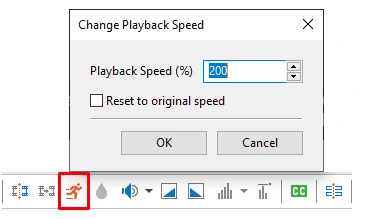
9. Change Video Speed
When creating projects, there may be some parts of the recorded video containing unimportant information like downloading process. So, you want to speed it up. Doing this will not only decrease the output time duration but also increase the viewers’ experiences. On the contrary, you can also slow it down when there is any part that you want viewers to take a careful look.
Select the video part and click the Change Playback Speed icon. Then specify the desired speed in the pop-up dialog. Whatever number which is greater than 100 will make your video play faster and vice versa. Of course, you can change the speed for the whole video. In that situation, click the video to select it instead of selecting a specified video range.
Whenever you want to come back to the original speed, check the Reset to original speed checkbox.
The Changing Video Speed tutorial features all needed and detailed steps to work with that, come to check it if needed.
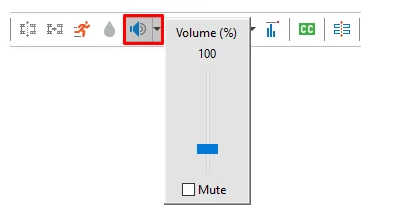
10. Change Audio/Video Volume
Like changing the video speed, you can increase or decrease the volume for the whole video or just some parts of it.
Select video range and click the Adjust Volume icon then scale it the way you want.
The tutorial about adjusting volume for audio and video is available on our website. Let’s come to see more clearly how it works.
11. Fade in/out Background Music
Fade in and fade out is a useful feature that helps to smooth the beginning and end of an audio track. You can also apply this effect to a video containing audio. You just need to specify and select an audio/video range then click the Audio Fade In/Out ![]() icon.
icon.
For more information, refer to Using Audio Fade In/Fade Out.
12. Reduce Audio Noise
After recording audio or webcam, you may want to eliminate unwanted background noise like electric fans, hums, or honking of horns. ActivePresenter offers a feature: Audio noise reduction to help you deal with that.
You can apply audio noise reduction to a certain range of an audio track or to the entire track. There are two steps you need to perform to apply this effect to your audio track:
The first step is to get a noise profile. Specify the range that contains only background noise so as that ActivePresenter can identify the noise. Then, click the arrow next to the Audio Noise Reduction button to select Get Noise Profile.
The second step is to reduce noise. Specify the range or the audio track you want to apply the effect. Next, click the Audio Noise Reduction button to adjust the noise reduce controls in the Noise Reduction dialog. Then click OK to finish.
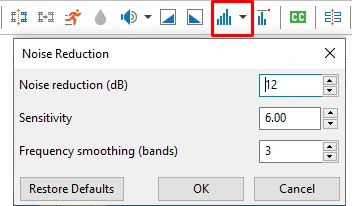
Note: You may have to try the effect several times for the audio range that contains inconstant noise like taking or music.
For more information, take a look at our tutorial: Using audio noise reduction.
13. Add Closed Caption to Video
Needless to say, Closed Caption plays a vital role in creating videos. Using it, users will have the capability to understand the videos even when they are in noise restricted area, or in case the narration language is not their mother tongue.
In order to have a Closed Caption, click the CC icon and type in the Closed Caption box that appears on the Canvas.
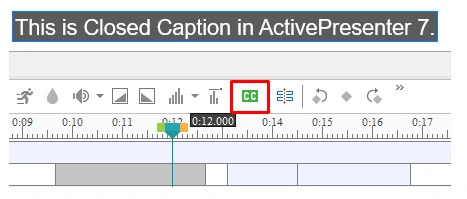
In ActivePresenter, you can have as many Closed Captions as you want. However, they display in order of time, so there is only one Closed Caption can be shown at one time.
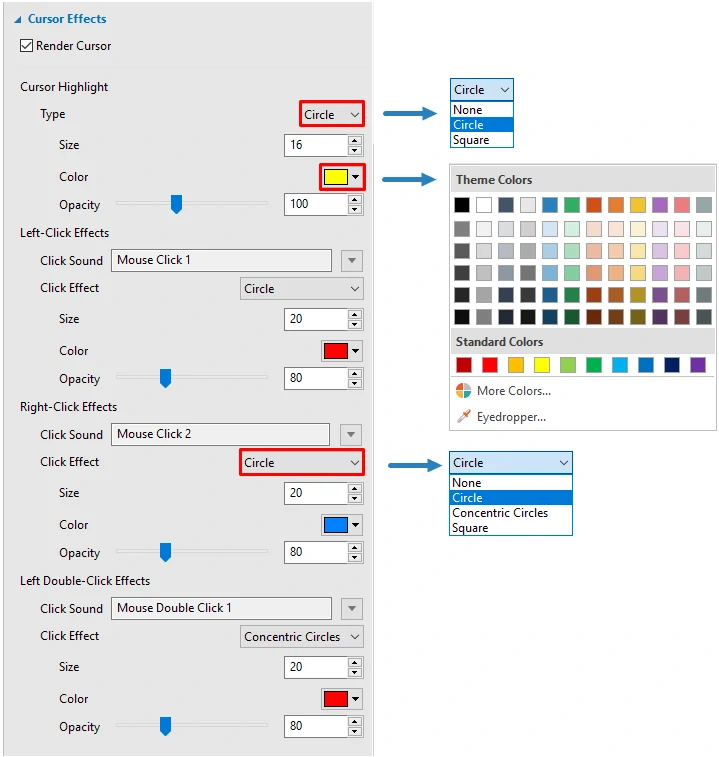
Change Mouse Cursor for Captured Video
After capturing your screen, the video contains recorded mouse cursors. So you can change their attributes such as cursor shape, color, mouse click sound and effect. This will help a lot in drawing audience attention to your mouse movement on the screen hence making it easier for them to keep track with the contents. To do that, you can come to the Cursor Effect section in the Properties pane and change the attributes you want.
If the information above is not detailed enough for you, then the tutorial Changing Mouse Cursor in Captured Videos is available, you can refer to it to see more details.
Export with ActivePresenter
Finally, let’s export your projects to appropriate output formats.

As being shown in the Export tab above, ActivePresenter offers you many types of output formats among which you can choose the one that meets your requirements.
As an illustration, while video must be the target output for those who create video demos or video tutorials, HTML5 Simulation (with SCORM and Tin Can API supported) will be the target format for those who create interactive eLearning contents.
Now that I have walked you through all the basic and essential features of ActivePresenter 7. Hope that you find this guide helpful and it saves you some time in recording as well as creating eLearning projects. Give ActivePresenter a try and see how it can boost your productivity at work.