The Drag-n-Drop question is a type of matching question. It requires learners to drag a text or image and drop it into the correct area called drop target. Using this question type, you can create many engaging games without consuming a lot of time and effort.
This tutorial will show you how to create a Drag-n-Drop question through 6 stages:
- Insert a Drag-n-Drop Question
- Customize a Drag-n-Drop Question
- Set Correct Answer
- Set Score and Reporting
- Add Events – Actions
- Customize Feedback Layers
Let’s start right now!
Insert a Drag-n-Drop Question
To insert a Drag-n-Drop question, do either of the following:
- Open the Questions tab > Drag-n-Drop
 .
.

- Open the Home tab > Interactions > Drag-n-Drop.
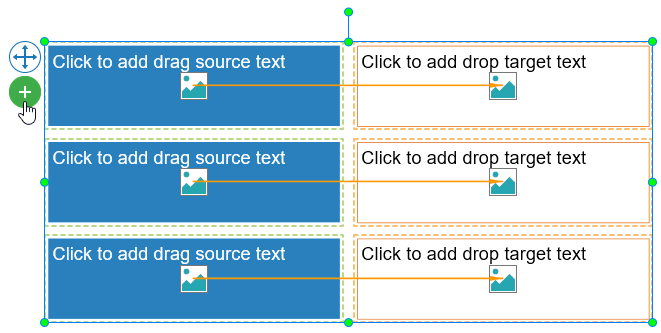
Then, the new question slide appears as below with three parts:
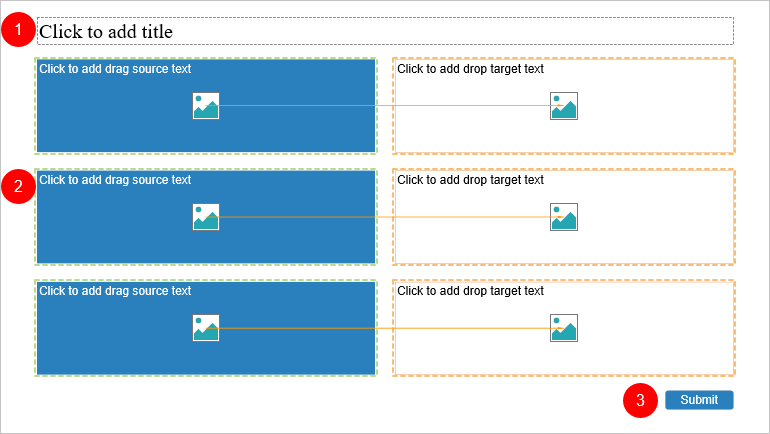
- (1) the top text box to add the question title;
- (2) the answer area with default pairs of drag sources and drop targets connected by orange arrows that indicate the correct answers;
- (3) and the Submit button.
Note:
- A drag source has a green dashed boundary. Meanwhile, a drop target has an orange dashed boundary. These boundaries don’t appear in the output but in the editor.
- Drag-drop connectors (orange arrows) connecting the drag sources to the drop targets denote that dropping the drag source to the drop target is the correct action.
- The dashed boundaries and drag-n-drop connectors appear by default but you can hide them by clicking the Drag-n-Drop button in the View tab.
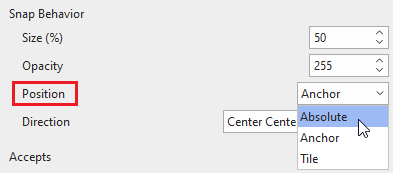
- A drop target can accept one or multiple drag sources. However, when you drop multiple drag sources into a drop target, the drag sources may overlap each other. To avoid this, you need to customize the snap behavior of the drag sources. Select a drop target > Properties pane > Interactivity > Drag-n-Drop > Snap Behavior > select Absolute or Tile in the Position dropdown list, then change the Direction if needed.
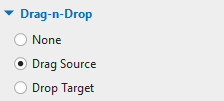
- You can convert a drag source to a drop target, and vice versa. To do that, select a drag source/drop target > Properties pane > Interactivity > Drag-n-Drop > select Drag Source or Drop Target.
Customize a Drag-n-Drop Question
Below are what you can do to customize this question:
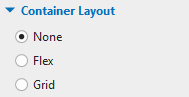
- Change the container layout: Select the answer area > Properties pane > Size & Properties tab > Container Layout > select the layout mode that you want.
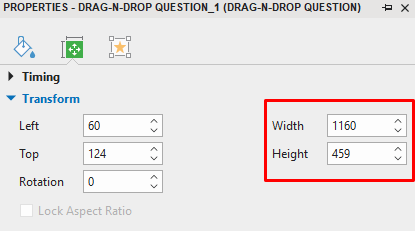
- Resize the question title (1) and the answer area (2): Drag the resizing handles, or adjust the Width and Height values in the Transform section (Properties pane > Size & Properties).
- Insert more drag sources and drop targets: Select the answer area (2) and click the plus button:
- Delete drag sources and drop targets: Select one or more drag sources and drop targets and press DELETE on your keyboard. Alternatively, right-click one and select Delete.
- Format drag sources and drop targets: Select the answer area > Format tab > select one style from the Quick Styles section, or use tools in the Style Tools section.

- Edit/ Add text to drag sources and drop targets: Click the default text to add your text.
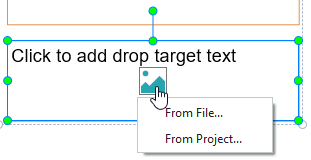
- Add images to drag sources and drop targets: Click the Image button to insert an image From File or From Project:
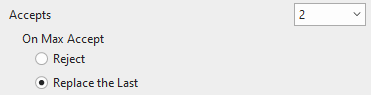
- Change the accept option of drop targets: By default, a drop target accepts infinite drag sources. But, you can specify how many drag sources a drop target accepts. Select a drop target > Properties pane > Interactivity > Drag-n-Drop > select a number from the Accepts dropdown list. Then, select either of these options to take action when you drag maximum drag sources into a drop target:
- Reject: The drop target doesn’t accept the new drag source when it reaches the maximum number of drag sources. The new drag source will be sent back to its original position.
- Replace the Last: The last drag source will be replaced by the new drag source and sent back to its original position.
Tip: After customizing the question, you can set it as the default question to reuse later. To do that, right-click the answer area and select Set as Default Drag-n-Drop Question. By doing so, the next time when you insert a new Drag-n-Drop question, this default question will appear.
Set Correct Answers for Drag-n-Drop Questions
There are two ways to set the correct answer to a Drag-n-Drop question.
(1) Click the drag source until it shows the marker ![]() , then click and drag it into the drop target.
, then click and drag it into the drop target.
(2) Select a drop target > Properties pane > Interactivity tab > Drag-n-Drop > click ![]() to open the Accept List dialog.
to open the Accept List dialog.
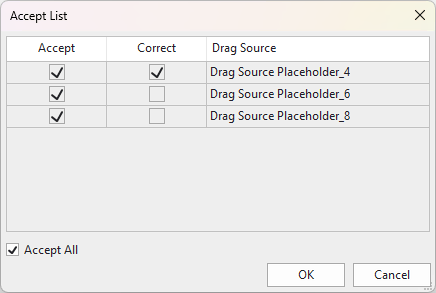
In the dialog,
- Accept: Select one or more checkboxes in this column to specify drag sources that can be dropped into the drop target. If you allow learners to drag all drag sources into the drop target, select Accept All.
- Correct: Select one or more checkboxes to set the corresponding drag sources as correct answers.
- Drag Source: Display the names of all drag sources in the question.
So in this example, the drop target accepts all drag sources, but only Drag Source Placeholder_4 is correct.
Set Score and Reporting
To set score and reporting for a Drag-n-Drop question, select the answer area > Properties pane > Interactivity tab > Score & Reporting.
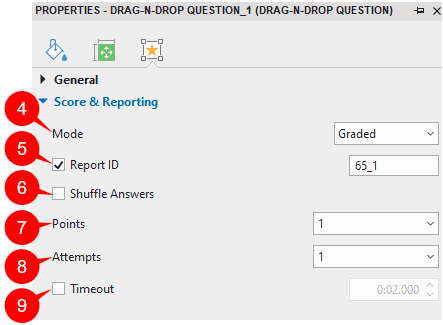
This section provides some question properties that you can customize:
- (4) Mode: Select the Graded mode to measure learners’ performance. Otherwise, select the Survey mode to collect learners’ feedback or information.
- (5) Report ID: Track learners’ results. You can rename it to a meaningful name.
- (6) Shuffle Answers: Select this option to mix up drag sources each time learners load the question.
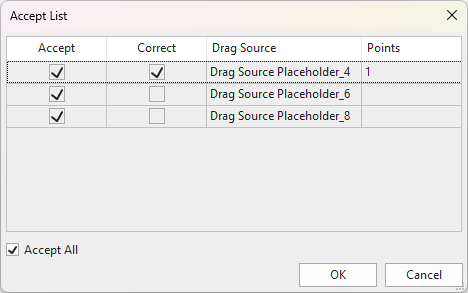
- (7) Point: Set points for correct answers. You can set partial scores for each correct pair. Select Partial from the list, then the Points column will appear in the Accept List dialog. Click this column and enter the score values for the correct answers.
To learn more, see Assign Scores to Questions.
- (8) Attempts: Set the maximum attempts that learners can interact with the question.
- (9) Timeout: Select this checkbox and enter the time duration into the box to set a time limit to the question.
For more details, see How to Create Interactive Quizzes.
Add Events and Actions
ActivePresenter 9 offers default events and actions for Drag-n-Drop questions. Generally, it has four default events for the Graded mode (On Correct, On Incorrect, On Incomplete, and On Timeout) and three for the Survey mode (On Complete, On Incomplete, and On Timeout).
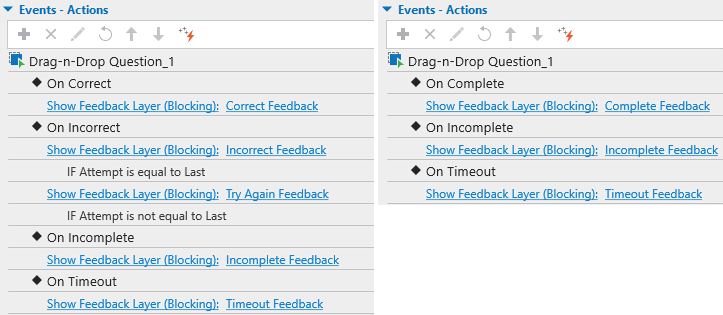
However, you can remove, edit, or add more to make it interactive the way you want. To do that, select the answer area > Properties pane > Interactivity tab > Events – Actions.
To learn more, see Use Events – Actions to Add Interactivity to Courses.
Customize Feedback Layers
ActivePresenter 9 also automatically adds default feedback layers for Drag-n-Drop questions like others. These default feedback layers can be Correct Feedback, Incorrect Feedback, Try Again Feedback, Incomplete Feedback, and Timeout Feedback (for the Graded mode) or Complete Feedback, Incomplete Feedback, and Timeout Feedback (for the Survey mode). Bear in mind that you can delete, change, or add more if necessary.
See Use Feedback Layers to get more details.
Now, you’ve learned how to create Drag-n-Drop questions in ActivePresenter 9. Download the app right now and start creating fun interactive quizzes.

Besides, follow our Tutorials page and YouTube channel for more helpful articles and videos.
See more: