In the previous articles, you’ve learned how to create many interactive question types in ActivePresenter 9 such as True/False, Multiple Choice, Multiple Response and Essay questions. Now, turn to the next one – Fill in Text Entry questions.
Like Essay questions, this question type doesn’t give learners any predefined answer option list or dropdown to select. But, the difference is Essay questions offer a multiple-line text box for learners to type the answer, meanwhile Fill in Text Entry questions offer them a single-line text entry. This question type requires learners to type a word or phrase rather than a long text.

Let’s learn 6 stages to create a Fill in Text Entry question in this post:
- Insert a Fill in Text Entry Question
- Customize a Fill in Text Entry Question
- Set Correct Answer
- Set Score and Reporting
- Add Events – Actions
- Customize Feedback Layers
Firstly, download the latest version of ActivePresenter, and then get started.

Insert a Fill in Text Entry Question
To insert a Fill in Text Entry question, do either of the following:
- Open the Questions tab > Fill in Text Entry
 .
.

- Open the Home tab > Interactions > Fill in Text Entry .
Then, a new question slide appears as the below image:
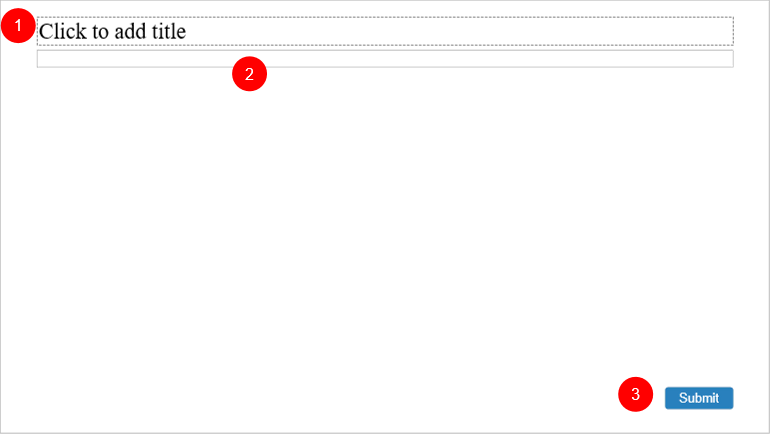
As you can see, a Fill in Text Entry question slide has three parts:
- (1) the top text box to add a question or a statement providing missing information;
- (2) the answer area with only one text entry (or the blank) which learners can type their answer in.
- (3) and the Submit button.
Customize a Fill in Text Entry Question
This question has only one text entry. So, you can neither remove nor add more. If you want to have more text entries, consider using Fill in Text Entries questions.
Here are some options that you can use to customize this question:
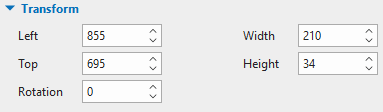
- Resize the question title (1) and answer area (2): Select them and drag their resizing handles. Alternatively, adjust the Width and Height values in the Properties pane > Size & Properties > Transform to change their size.
- Format the text entry: Select the text entry and access the Format tab to change its style the way you want. You can select a built-in style in the Quick Styles gallery. Alternatively, edit it using tools in the Style Tools section or Style & Effects tab of the Properties pane.

- Change the shape of the text entry: Click Change Shape to change to a rounded-corner rectangle if you want.
- Reset to the original style: After formatting the text entry, right-click it and select Reset Placeholder if you want to remove all changes you’ve made and reset it to the original style.
Set Correct Answers
To set correct answers for this question, please follow these steps:
Step 1: Select the text entry, then navigate to the Properties pane > Interactivity > General.
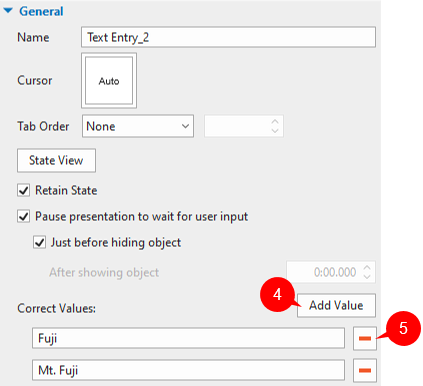
Step 2: Click the Add Value button (4) to display a blank box, then type the correct value into it. Repeat this step until you add enough correct values.
To delete any correct values, click the Remove button (5).
Set Score and Reporting
To set the score and reporting for the question, select the answer area, and then navigate to the Properties pane > Interactivity > Score & Reporting.
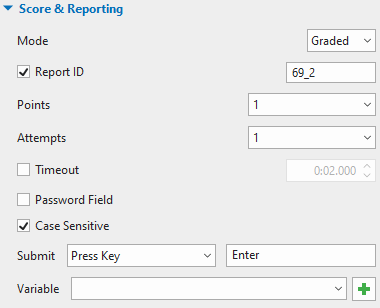
This section provides you with a lot of useful options to customize:
- Mode: Select the Graded mode if you want to measure learners’ performance. Otherwise, select the Survey mode if you want to collect learners’ feedback or information.
- Report ID: Track learners’ activities. You can change it to a meaningful ID for easier tracking.
- Points: Set scores for correct answers.
- Attempts: Set the maximum attempts that learners can interact with the question.
- Timeout: Set a time limit that only allows learners to respond to the question in the given amount of time.
- Password Field: Select this checkbox, all characters that learners type in the text entry will not be shown.
- Case Sensitive: Select this checkbox to differentiate uppercase and lowercase characters.
- Submit: Provide two options: Press Key or Auto to submit the entered text.
- Variable: Define the variable to take place. See What is Variable for more information.
For more details about these properties, see How to Create Interactive Quizzes.
Add Events and Actions
ActivePresenter 9 offers default events and actions for Fill in Text Entry questions. Generally, this question type has four default events for the Graded mode (On Correct, On Incorrect, On Incomplete, and On Timeout) and three for the Survey mode (On Complete, On Incomplete, and On Timeout).
If you’ve selected the Graded mode, here is what you’ll see:
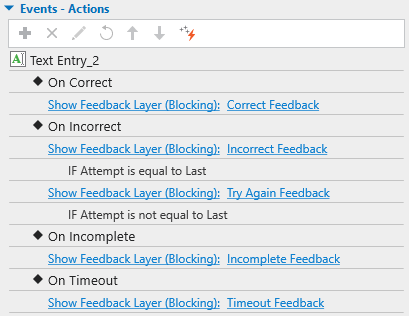
You can remove, change, or make events and actions more advanced as you wish. To do that, first, select the answer area. Then, access the Properties pane > Interactivity > Events – Actions.
To learn more, see Use Events – Actions to Add Interactivity to Courses.
Customize Feedback Layers
ActivePresenter 9 automatically adds default feedback layers for Fill in Text Entry questions. These default feedback layers can be Correct Feedback, Incorrect Feedback, Try Again Feedback, Incomplete Feedback, and Timeout Feedback (for the Graded mode) or Complete Feedback, Incomplete Feedback, and Timeout Feedback (for the Survey mode). Note that you can delete, change, or add more if necessary.
See Work with Feedback Layers for details.
So, you’ve just learned how to use Fill in Text Entry questions in ActivePresenter 9. Besides, don’t forget to visit our Tutorials page and YouTube channel for more tips and tricks using this app.
See more: