Slide background has a huge impact on the look and feel of your presentation. In this tutorial, you will learn how to change the slide background in ActivePresenter 9.
There are four ways to change the background of slides as follows:
Now, it’s time to explore them one by one.
1. Customize with Background Fill
ActivePresenter 9 gives you complete control over your background design. By using Background Fill, you can fill the background with a solid color, gradient, or image.
Apply a Solid Color to Slide Background
Step 1: Navigate to the Properties pane > Slide Properties tab > Background Fill section > select Solid Fill.
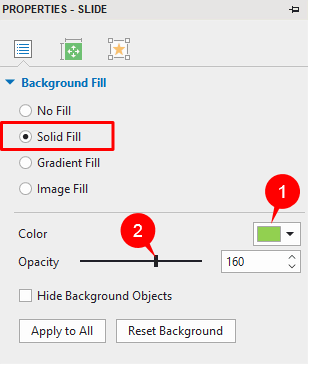
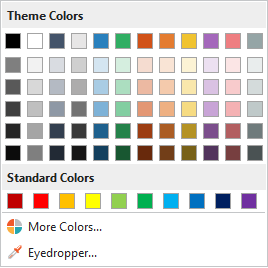
Step 2: Click Color (1) and choose the color you want. You can use an available background color in the Theme Colors or Standard Colors section. Besides, click More Colors to create a custom color, or use Eyedropper to select a color you want to match and apply to selected slides.
Step 3: (Optional) Drag the Opacity slider (2) to change the opacity level of the background. Alternatively, enter your desired value in the Opacity spin box or click the up/down button to increase/decrease the value.
Apply a Gradient Color to Slide Background
Apart from Solid Fill, Gradient Fill helps you fill the selected slides with a gradient of two or more colors that blend into one another. ActivePresenter 9 provides you with two gradient styles:
- Linear gradient: This makes colors change on a straight line, either horizontally, vertically, or diagonally.
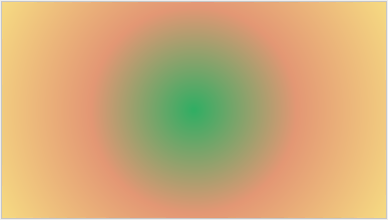
- Radial gradient: This creates a circular progression between colors. Besides, the central color is merged into other colors that radiate from the center, either in an ellipse or in a circle.
With each style of the gradient, you can change its Transform and Gradient Stops properties.
Linear Gradient
This gradient type is selected by default. It consists of two default color stops: black and white. But you can change the colors and add as many color stops as you want to create different linear gradient effects.

To work with a linear gradient, mind the following:

- Angle: Set the angle of direction for the gradient line. By default, a linear gradient runs horizontally from left to right with an angle of 0 degrees. 90 degrees creates a top-to-bottom vertical gradient. As the degree increases, the gradient direction rotates clockwise.

- Offset X (%, range from -100 to 100): Drag the Offset X slider to the right or left to change the position of gradient stops horizontally. Or, input the value into the spin box.
- Scale X (%, range from 10 to 250): Drag the Scale X slider to the right or left to change the width of gradient colors, or input the value into the spin box. When the value is “10”, the width of gradient colors is minimum. When the value is “250”, this value is maximum.
- Gradient strip (3): Display the preview of the gradient. Use it to make visual changes to the gradient.
- Color stop: Represent a color. The selected color stop has a blue border (4). To add a color stop, click on the strip or click the Add button. To delete a color stop, select it and click the Remove button.
- Position (%): Specify the position of the selected color stop, where you want to color to start. Alternatively, drag the color stops along the strip to do that. By default, the starting and ending color stop has a position of 0% and 100% respectively.
- Color: Display the color of the selected color stop.
- Opacity: Change the opacity level of the selected color stop.
Radial Gradient
Like linear gradients, radial gradients also create a gradual blending between two or more colors. But this gradient style radiates from its center.
To apply radial gradients, select Radial from the Type dropdown list (5).
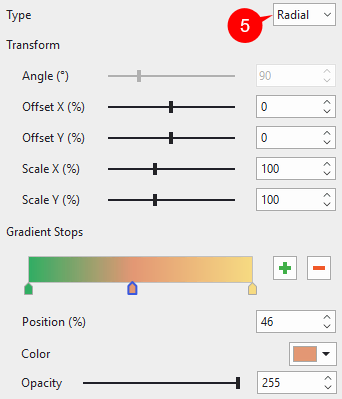
- Offset X (%, range from -100 to 100): Move the center color horizontally. When the value is “-100” or “100”, the background fill is the starting color of the gradient. In contrast, when the value is “0”, the background fill is a blending of two colors.
- Offset Y (%, range from -100 to 100): Same as Offset X, but move the center color vertically. When the value is “-100”, the center color is moved to the top. When the value is “100”, the center color is moved to the bottom.
- Scale X (%, range from 10 to 250): Drag the Scale X slider to specify the width of the center color horizontally. When the value is “10”, the center color shrinks to the minimum size. When the value is “250”, the center color extends to the maximum size.
- Scale Y (%, range from 10 to 250): Drag the Scale Y slider to specify the width of the center color vertically. When the value is “10”, the center color shrinks to the minimum size. When the value is “250”, the center color extends to the maximum size.
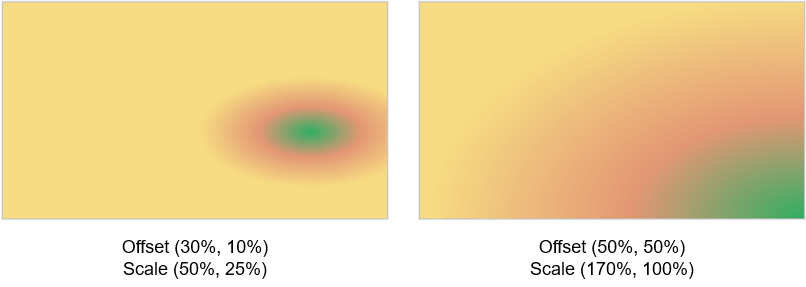
- Gradient Stops properties of radial gradients are the same as those of linear gradients.
Note:
- Percent values of Offset X and Scale X are relative to the width of slide size.
- Percent values of Offset Y and Scale Y are relative to the length of slide size.
Import an Image as Slide Background
Otherwise, ActivePresenter 9 allows you to fill a slide with an image. You can select an image from the current project or import it from your file system.

After that, select either Tile or Stretch:
- Tile: Repeat the same image throughout the background, making multiple tiles of the image. This is meant for small images.
- Stretch: Extend the image to all edges of the slide by distorting or shrinking it.
These two options are useful as the image’s dimensions don’t match the slide size.
Besides, select Apply to All to fill that image as the background of all slides in the current project. If you want to discard the changes, click the Reset Background button.
Note:
- Don’t fill slides with a too large image, as it may cause slow loading.
- You can use Background Fill to fill the background of specific slides regardless of theme or Theme Colors.
2. Use Background Styles
As you may know, ActivePresenter 9 offers 12 Preset Background Styles. These background styles vary from theme color to theme color that you’ve applied to the current project. So, to change the slide background, select your slides > open the Design tab > select Background Styles.
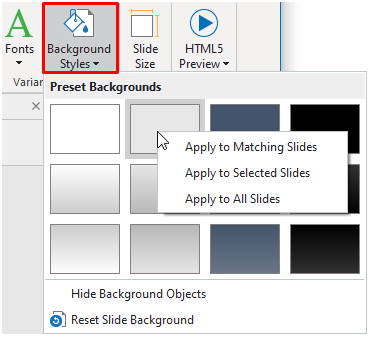
Then, select the style you want, or right-click a style and choose any of the following:
- Apply to Matching Slides: Work the same as when you click a style.
- Apply to Selected Slides: Apply the background style to currently selected slides only. The option comes in handy when you want to apply different styles to different slides.
- Apply to All Slides: Apply the background style to all slides in your working project.
3. Use Background Image
Similar to Image Fill, this way also allows you to set an image as the slide background. In this way, you can edit the image with the Image Editor.
Add Background Image
Do as follows to add a background image:
Step 1: Select one or more slides that you want to change the background.
Step 2: Navigate to the Background Image section in the Slide Properties tab of the Properties pane.
After that, do either of the following to insert images:
- Click
 to select an image from the current project. Then, the Select an image… dialog appears. You can choose any image you want.
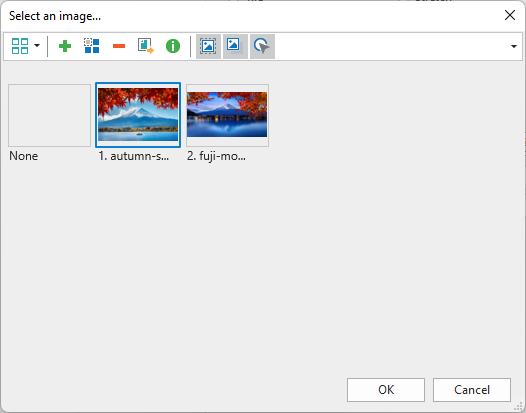
- Click to import an image from your file system.
Then, you see the new image inserted into the selected slide.
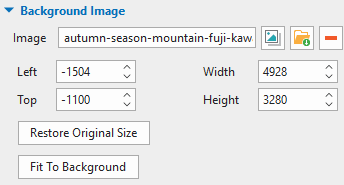
If the imported image is larger than the slide size, it will be cropped. For this reason, ActivePresenter 9 lets you change the background image position and size (in px or %).
- Left: Specify the X position of the background image from the top-left corner.
- Top: Specify the Y position of the background image from the top-left corner.
- Width: Display the original width of the background image, but it’s changeable.
- Height: Display the original height of the background image, but it’s changeable.
If the changes don’t please you, click Restore Original Size to restore the imported image to its initial size. Besides, you can select Fit To Background to make the imported image fit the slide size.
In case you want to delete the background image of the current slide, click Remove ![]() .
.
Edit Background Image
As mentioned above, ActivePresenter 9 allows you to edit the background image right inside the app. This feature is useful when you record interactive simulations. To open the Image Editor, right-click the background image, and select Edit Background Image.
Then, the Image Editor appears like this:
As you can see, the Drawing tab brings you a variety of image editing commands. These commands are very common, so editing the background image may come naturally to you. After finishing editing, click this button ![]() to save the changes. Then, back to the current slide, you will see the new background image.
to save the changes. Then, back to the current slide, you will see the new background image.
4. Use Slide Masters
Another way to change the slide background is using Slide Master. This feature comes in handy if you want to edit the background for each slide layout. For example, you are designing an eLearning game. The game layout includes 1 title slide, 1 content slide, 5 question slides, and 1 ending slide. You want to set the slide background differently for each slide layout. Using this way will help you save tons of time.
Do as follow to change the background:
- Open the View tab > Slide Master.
- Select a slide layout.
- Navigate to the Background Fill section in the Properties pane.
- Change the background as described in part 1.
- Click Close Master View to save the changes.
For more information, see Work with Slide Masters.
Now that you’ve known how to change slide background in ActivePresenter 9. Feel free to download the app by clicking the button below and contact us if you encounter any obstacles.

Besides, follow our Tutorials page and YouTube channel for more tips and tricks when using this app.
See Also: