ActivePresenter 9 provides you with up to 5 ways to insert audio tracks into the app. Keep reading the article to explore what they are!
As you may know, audio and images are considered a perfect pair in designing eLearning courses because of their ability to make lessons even more engaging, emotional, and memorable for learners. With ActivePresenter 9, you can add an audio track to a single slide or set it as background music that plays during the entire project. Also, the software allows you to insert an audio track into a specific object such as a shape, text caption, and button.
Overall, there are five main ways to insert audio tracks into the app:
- Drag audio tracks into the app
- Import audio from existing files
- Record a new audio track inside the app
- Add built-in audio tracks
- Use the Text-to-Speech feature
It is possible to insert almost any sound into your projects in many formats, including MP3, OGG, WMA, and WAV. Then, you’re free to edit the inserted audio track or remove it if you no longer need it in your project. But first, download the latest version of ActivePresenter here:

Drag Audio Tracks and Drop into the App
As you may know, dragging and dropping the audio tracks from your computer into ActivePresenter is the fastest way to insert them. So, you can perform this step to insert audio tracks into ActivePresenter 9 with ease. Or, consider other alternative manipulation below.
Insert Audio from Existing Files
Here are the steps to insert audio from existing files to ActivePresenter 9:
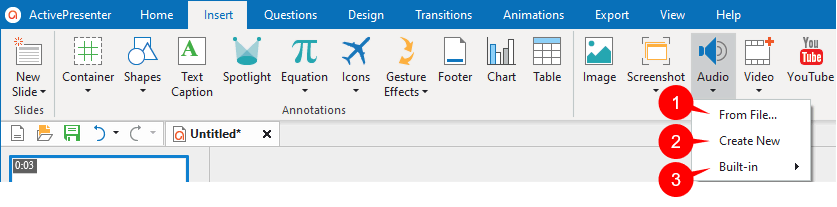
Step 1: Select a slide > Access the Insert tab > Audio > From File… (1).
Step 2: Select an audio track from your computer > click Open.
Then, you see an audio icon ![]() appears on the Canvas and the audio waveform appears on the Timeline pane. See the image below for detail:
appears on the Canvas and the audio waveform appears on the Timeline pane. See the image below for detail:

Record a New Audio Track
Instead of adding an existing audio file, ActivePresenter 9 lets you record a new audio track right inside the app. In case you have a microphone plugged into your computer, you can record your own voice in real-time. Here are the two options that you can choose:
- The Audio section in the Properties pane.
- The Record Narration button in the Timeline pane. It comes in handy to match the voice with the project’s content.
And let’s perform the following procedure:
Step 1: Select a slide > Access the Insert tab > Audio > Create New (2).
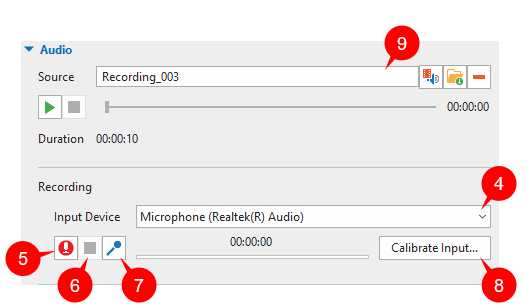
Step 2: Navigate to the Properties pane > Media tab > Audio section. In order to record new audio, you need to work with all the features in the Recording part.
Bear in mind that:
- Input Device (4): Select a device from the drop-down list.
- Record (5): Start recording.
- Stop recording (6): Select this when you’re done with the recording.
- Change input volume (7): Adjust the recording volume.
- Calibrate Input… (8): Set the audio recording devices to the appropriate level before recording.
After finishing recording, your recorded file will appear in the Source box (9).
When a slide contains both narration and system audio (or audio track), the Timeline displays two different waveform bars like this:

Note:
- If you want to capture audio from the beginning when creating a new project, please check out the Record System Audio and Narration tutorial to get detailed information.
- ActivePresenter doesn’t allow you to attach audio to the following objects: cursor path, zoom-n-pan, closed caption, check box, and radio button. Besides, you can’t attach an audio track to an object group.
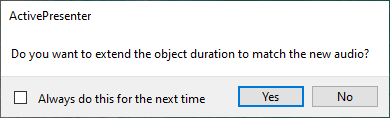
- If the object duration is shorter than the recorded audio duration, the app displays a dialog to ask whether you want to extend the object duration to fit the duration of the generated audio or not. In case you don’t want to get this notification in the future, select Always do this for the next time check box.
- The Audio section also provides Playback Options to control how the audio is played. This is useful when you insert audio as background music.
Insert Built-in Audio
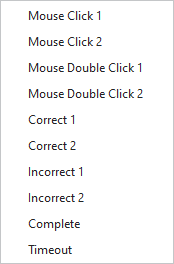
When it comes to built-in audio, ActivePresenter 9 provides you with some useful interactive objects like mouse clicks and feedback messages. To insert built-in audio, do as follows:
Step 1: Select the object that you want to insert audio.
Step 2: Open the Insert tab > Audio > Built-in (3) and choose one in the audio drop-down list.
After that, you will see an audio icon ![]() on the Canvas and the audio waveform in the Timeline pane.
on the Canvas and the audio waveform in the Timeline pane.
Insert Audio Using Text-to-Speech Feature
Besides the three above techniques, ActivePresenter 9 also supports you to generate audio from text. This feature is practical in some cases, especially when the object has text and you want it to be “read out loud”. Check out the tutorial Convert Text to Speech to know more.
Customize an Audio Track
Replace or Remove an Audio Track
After inserting audio tracks into ActivePresenter, to replace an audio track in your project, first, select the audio icon on the Canvas or the audio object on the Timeline pane. Then, navigate to the Properties pane > Media tab > Audio section. Here, you can do either of the following:
- Click
 to select another audio track from the current project.
 - Click to import another audio file from your computer.
Once done, the newly added audio track replaces the old one.
Next, to remove an audio track, take one of the following:
Select the audio icon on the Canvas > press DELETE. Alternatively, right-click the audio icon > select Delete.
Select the audio object on the Timeline pane > press DELETE. Or, right-click it > select Delete.
Select the audio object > Properties pane > Media tab > Audio section > select ![]() . This performance can also be used to remove audio from an object.
. This performance can also be used to remove audio from an object.
Edit an Audio
After inserting an audio track into a slide, you can preview and edit it in the Timeline with the following techniques:
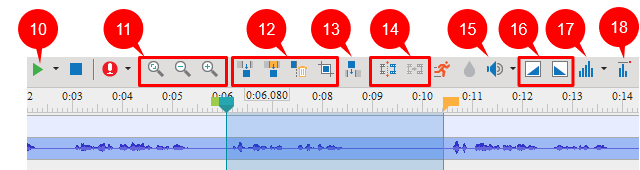
- Click Play (10) to listen to the audio.
- Select (11) to enlarge, shrink or fit the waveform into the Timeline.
- Select Cut, Copy, Delete, and Crop (12) to apply basic editing for the audio. See Basic Video Editing: Cut, Copy, Delete, and Crop for more details.
- Click Insert Time (13) to add an interval of silence. The silence is inserted at the Playhead position. See details at Insert Time to Videos
- Select Split/Join (14) to split/join the audio objects. See details at Split and Join Videos/Audio Tracks
- Click Adjust Volume (15) to increase or decrease the sound level of the audio file. See details at Adjust Audio Volume
- Select (16) if you want to fade in or fade out your audio file. See details at Fade in/Fade out Audio
- Click Audio Noise Reduction (17) to remove noise from an audio track. See details at Reduce Audio Noise.
- Click Audio Normalization (18) in case you want to make all your audio tracks have the same volume level. See details at Use Audio Normalization
Besides, remember that all of these options are available for both system audio and narration audio.
Now, you know all the ways to insert an audio track into ActivePresenter 9. Hope that this tutorial inspires you. Don’t hesitate to follow us on YouTube, Facebook, Twitter, and our Tutorial page to get more useful tutorials about designing eLearning courses and screencasts.
See More: